
Overview
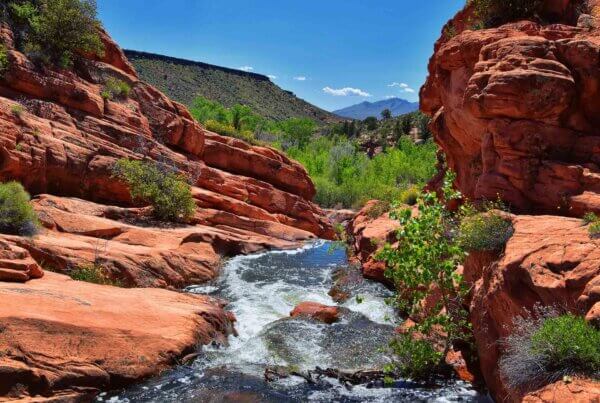
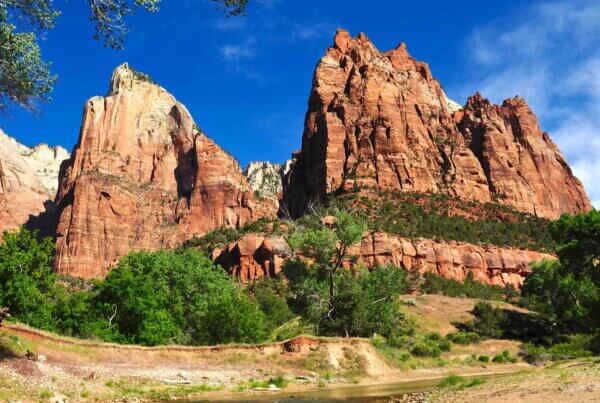
240 million years ago, Zion and its surrounding environs were a flat basin. All that was needed to turn the area into the wonder that it is today was trillions of pounds of deposited sediment, a massive uplifting pressure from deep within the earth to speed the flow of the Virgin River, and a little time for the relentless work of water to carry away cubic miles of rock to warmer climes downstream. Zion is a geological marvel and a physically arresting experience.
The pictures you see do not adequately convey its immense verticality. It just eats the horizon on three sides. To be within Zion canyon is to feel small. It is an experience that you should make time for.
Though it has dark skies and feels otherworldly, Zion is fairly easy to get to due to its relative proximity to Las Vegas, which is roughly three hours of mostly pretty driving away. Given how many places have direct and inexpensive flights to Vegas, this makes Zion a great weekend trip.
Location
High Desert
Activities
Hiking, Exploring, Eating, Climbing
Duration
4-5 days including travel both ways.
Getting There
Zion is three hours from Las Vegas. You could fly into St. George or drive in if you like, but the combination of cheap and plentiful flights to Vegas make it a pretty appealing option.
From Vegas there are really just two options to get there
- Shuttle: If you are going by yourself, this might be a good option for you, St George Shuttle runs between Las Vegas and St. George and then onto Zion and runs about $100. There’s typically a layover in St. George, so the whole trip can take 5-6 hours.
- Car Rental: This is the option we chose. We rented a car at the airport, but I’ve had good results through Turo. The drive is about 3 hours, and we needed the car for Bryce as well, so I really would recommend renting versus shuttling to the park.
Where to Stay
The closest hotels are in Springdale, UT, which is a few minutes outside the South Entrance to the park. We stayed at the Springhill Suites, which is very well regarded and exceeded our expectations. The room was super comfortable and the pool, which is surrounded by Zion’s majesty, was a great cool down after some long hikes.
Because it’s so close, Springdale is expensive. You can stay farther away down highway 9, but you’ll have a longer drive to get to the park, and you’ll be farther away from restaurants, which were mostly walkable from the Springhill Suites.
There are around 300 camping spots in Zion at South Campground and Watchman Campground respectively. The views and location can’t be beat, but it’s tent and limited connection camper camping.
The shuttles inside the park are a great way to get around. In fact, they are essential: from March to November, you can’t drive your car while the shuttles are in operation, so plan on shuttling a fair amount.
Day 1: Not just a travel day
This itinerary assumes you’ll arrive sometime in the mid to late afternoon since it takes three hours to get to Zion from Las Vegas and it’s tough to get to Vegas much before Noon. Even if you get in late though, you can still get a short hike in.
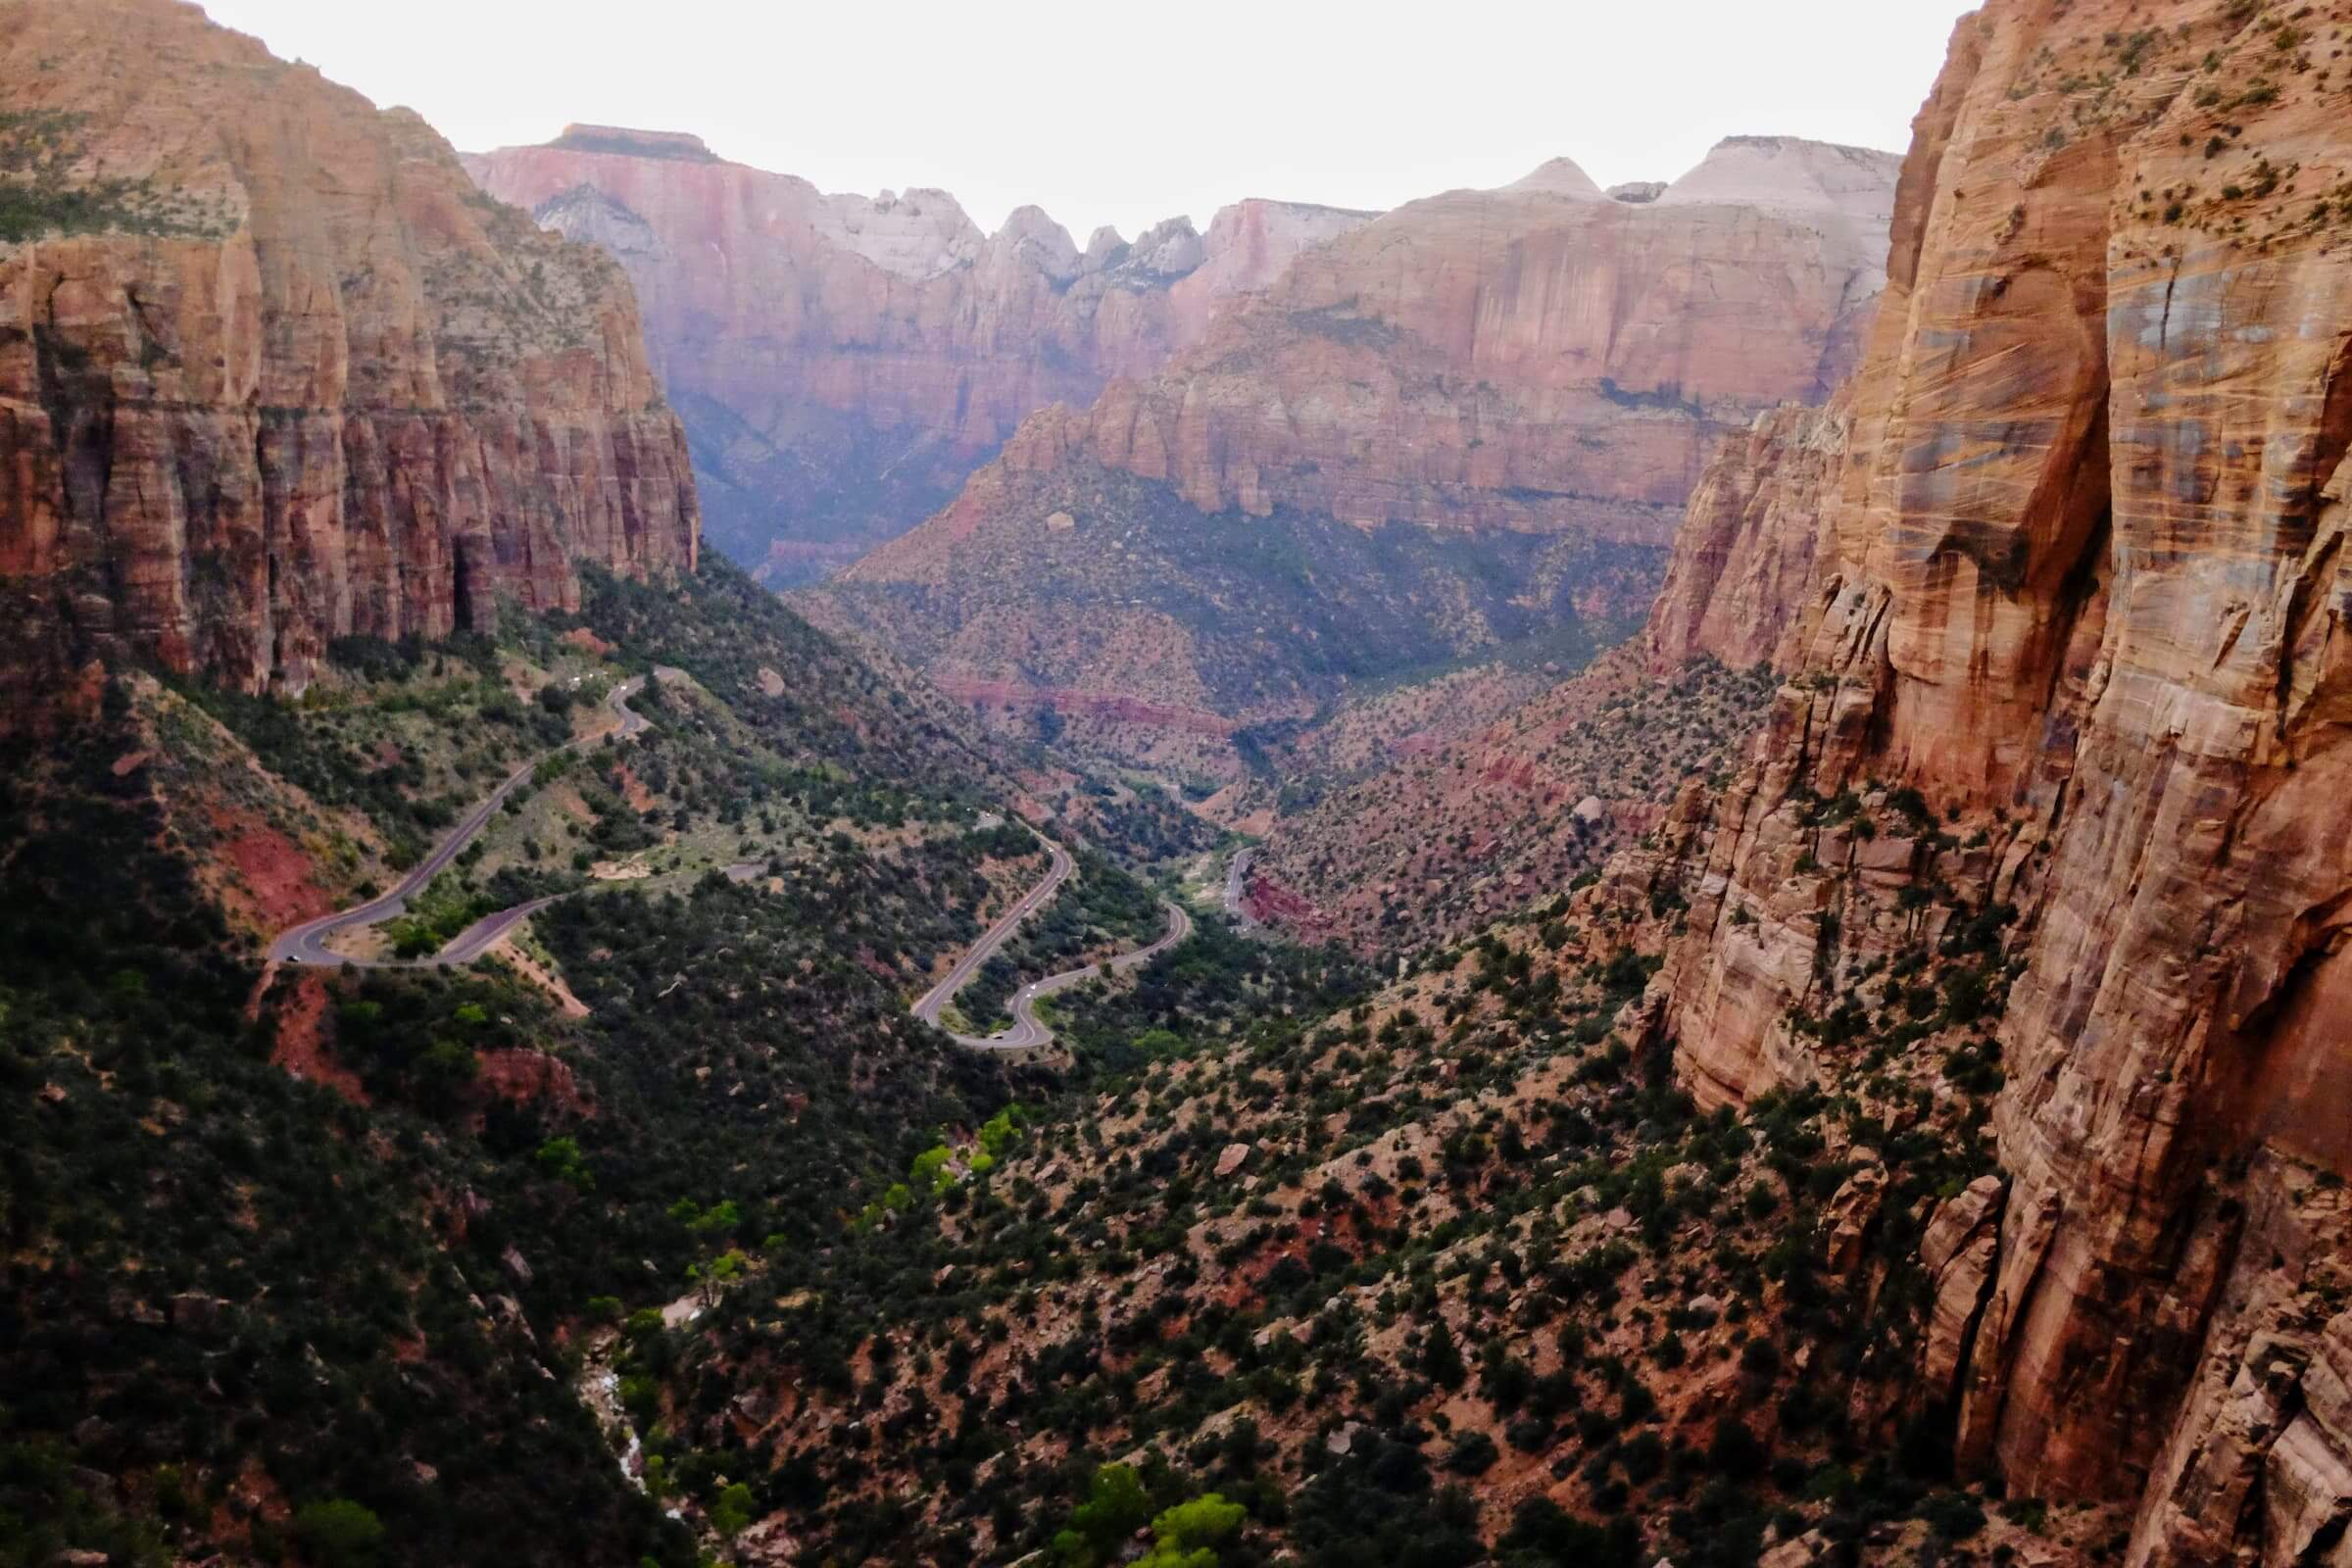
Once the shuttles stop running, you can drive into the park at no cost. You should definitely do this. Drive up scenic highway 9, through the switchbacks and tunnel, and park for a quick hike called the Canyon Overlook Trail.
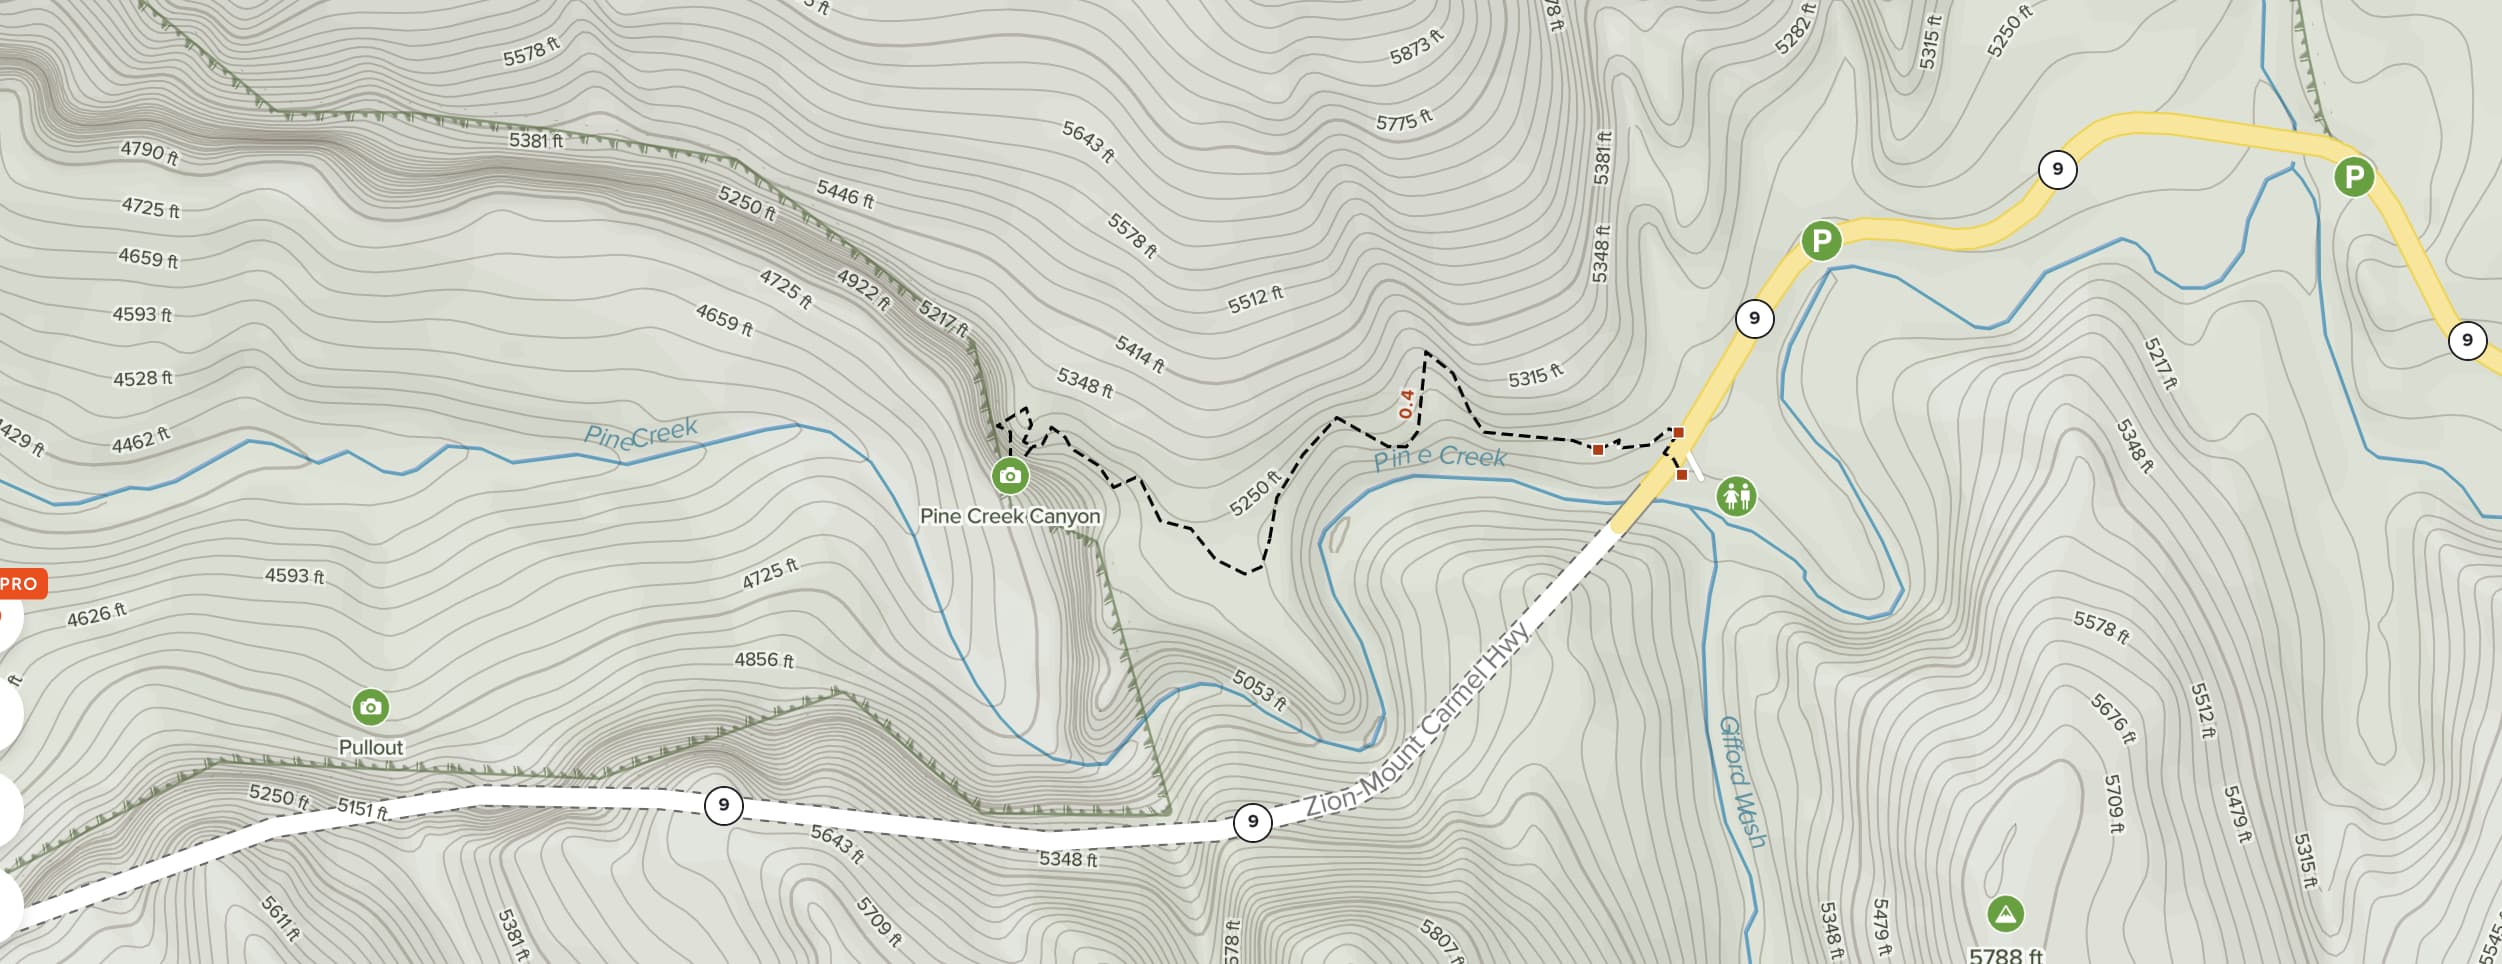
The Canyon Overlook Trail is less than a half mile trail up above the tunnel, and it looks back to overlook Zion Canyon (hence the name). It’s not the very best view in the park, but it is very good and in terms of the effort and time required to get it it is great bang for the buck. If you go towards the end of the day, it won’t be too crowded, which makes it even better.
After a day of travel, the Zion Canyon Overlook is an exceptionally quiet place to wind down and a convenient place for astrophotography if you want to hang out for a few hours.. The skies are very dark, and the hike there isn’t particularly exposed as long as you have a good flashlight or headlamp.
Note that it’s not a real “summit” per se, just plenty of place to spread out and experience the quiet as you watch the sun fade.
Dinner
For an easy and enjoyable dinner hit Zion Pizza and Noodle Company, which has a solid beer selection and tasty pies.
Note: Do not stay up late as you really want to get up early to avoid crowds. Yes I know you don’t like my tone, but I promise you it is worth it.
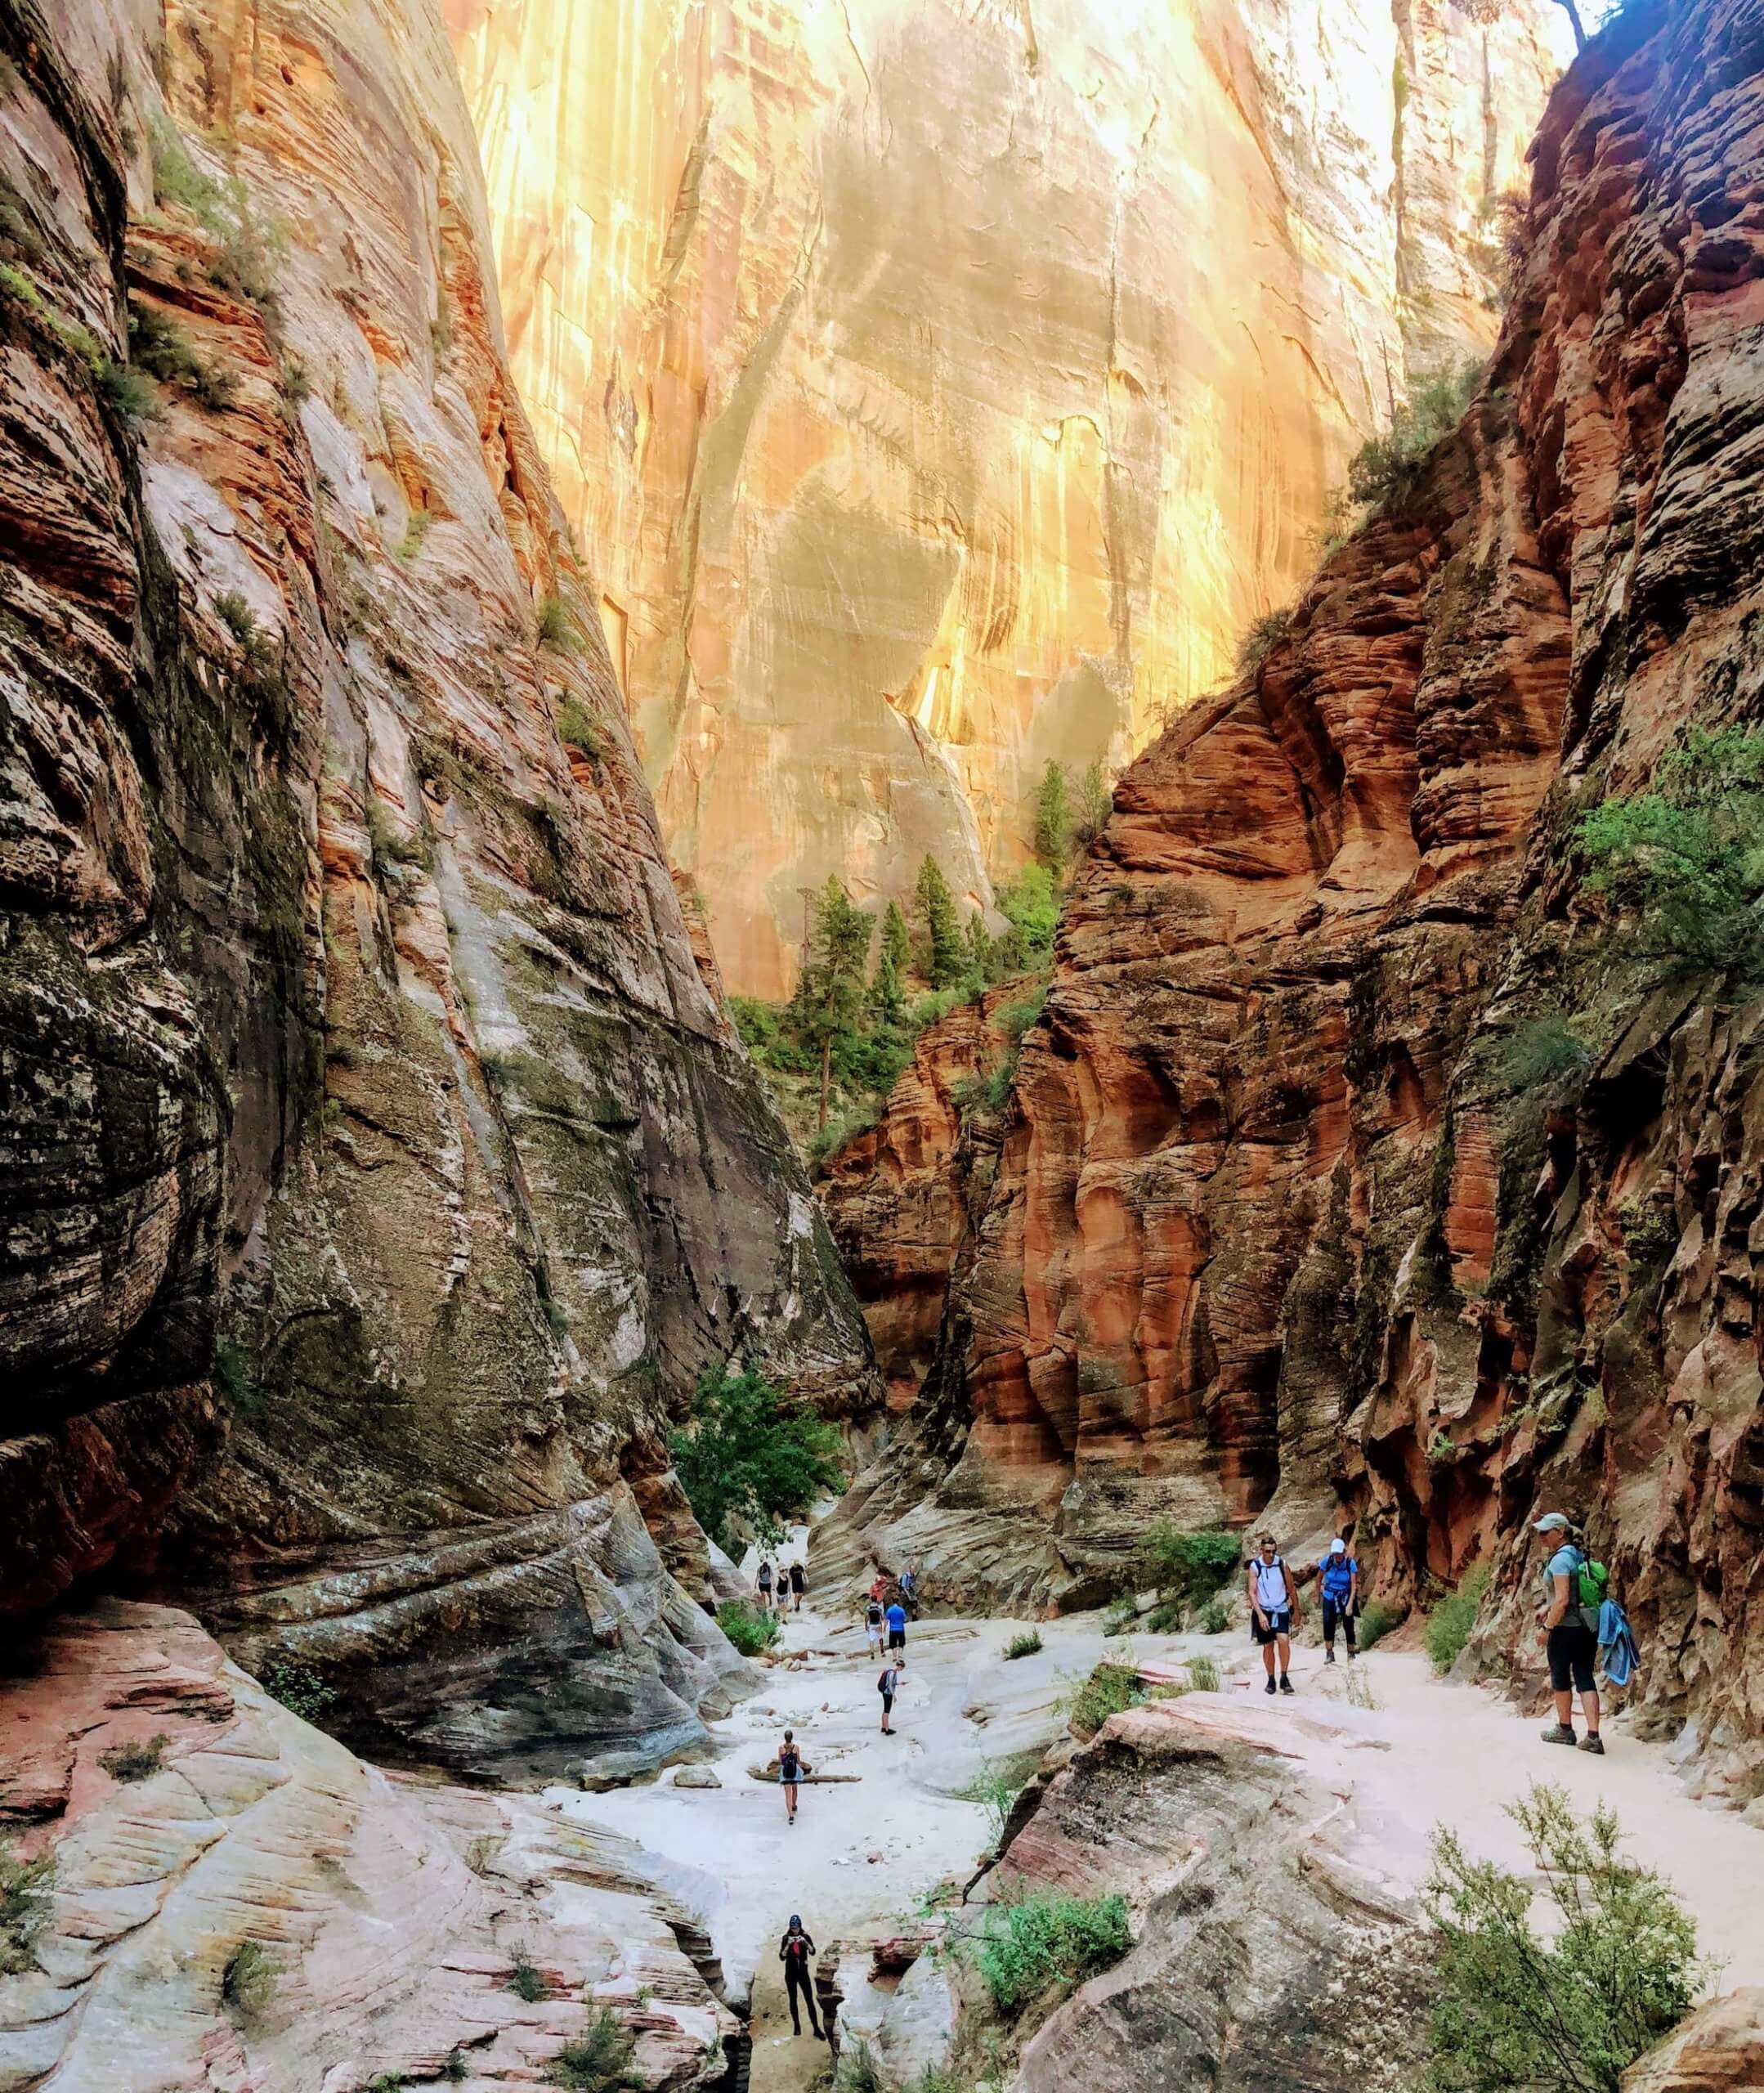
Day 2: The Narrows
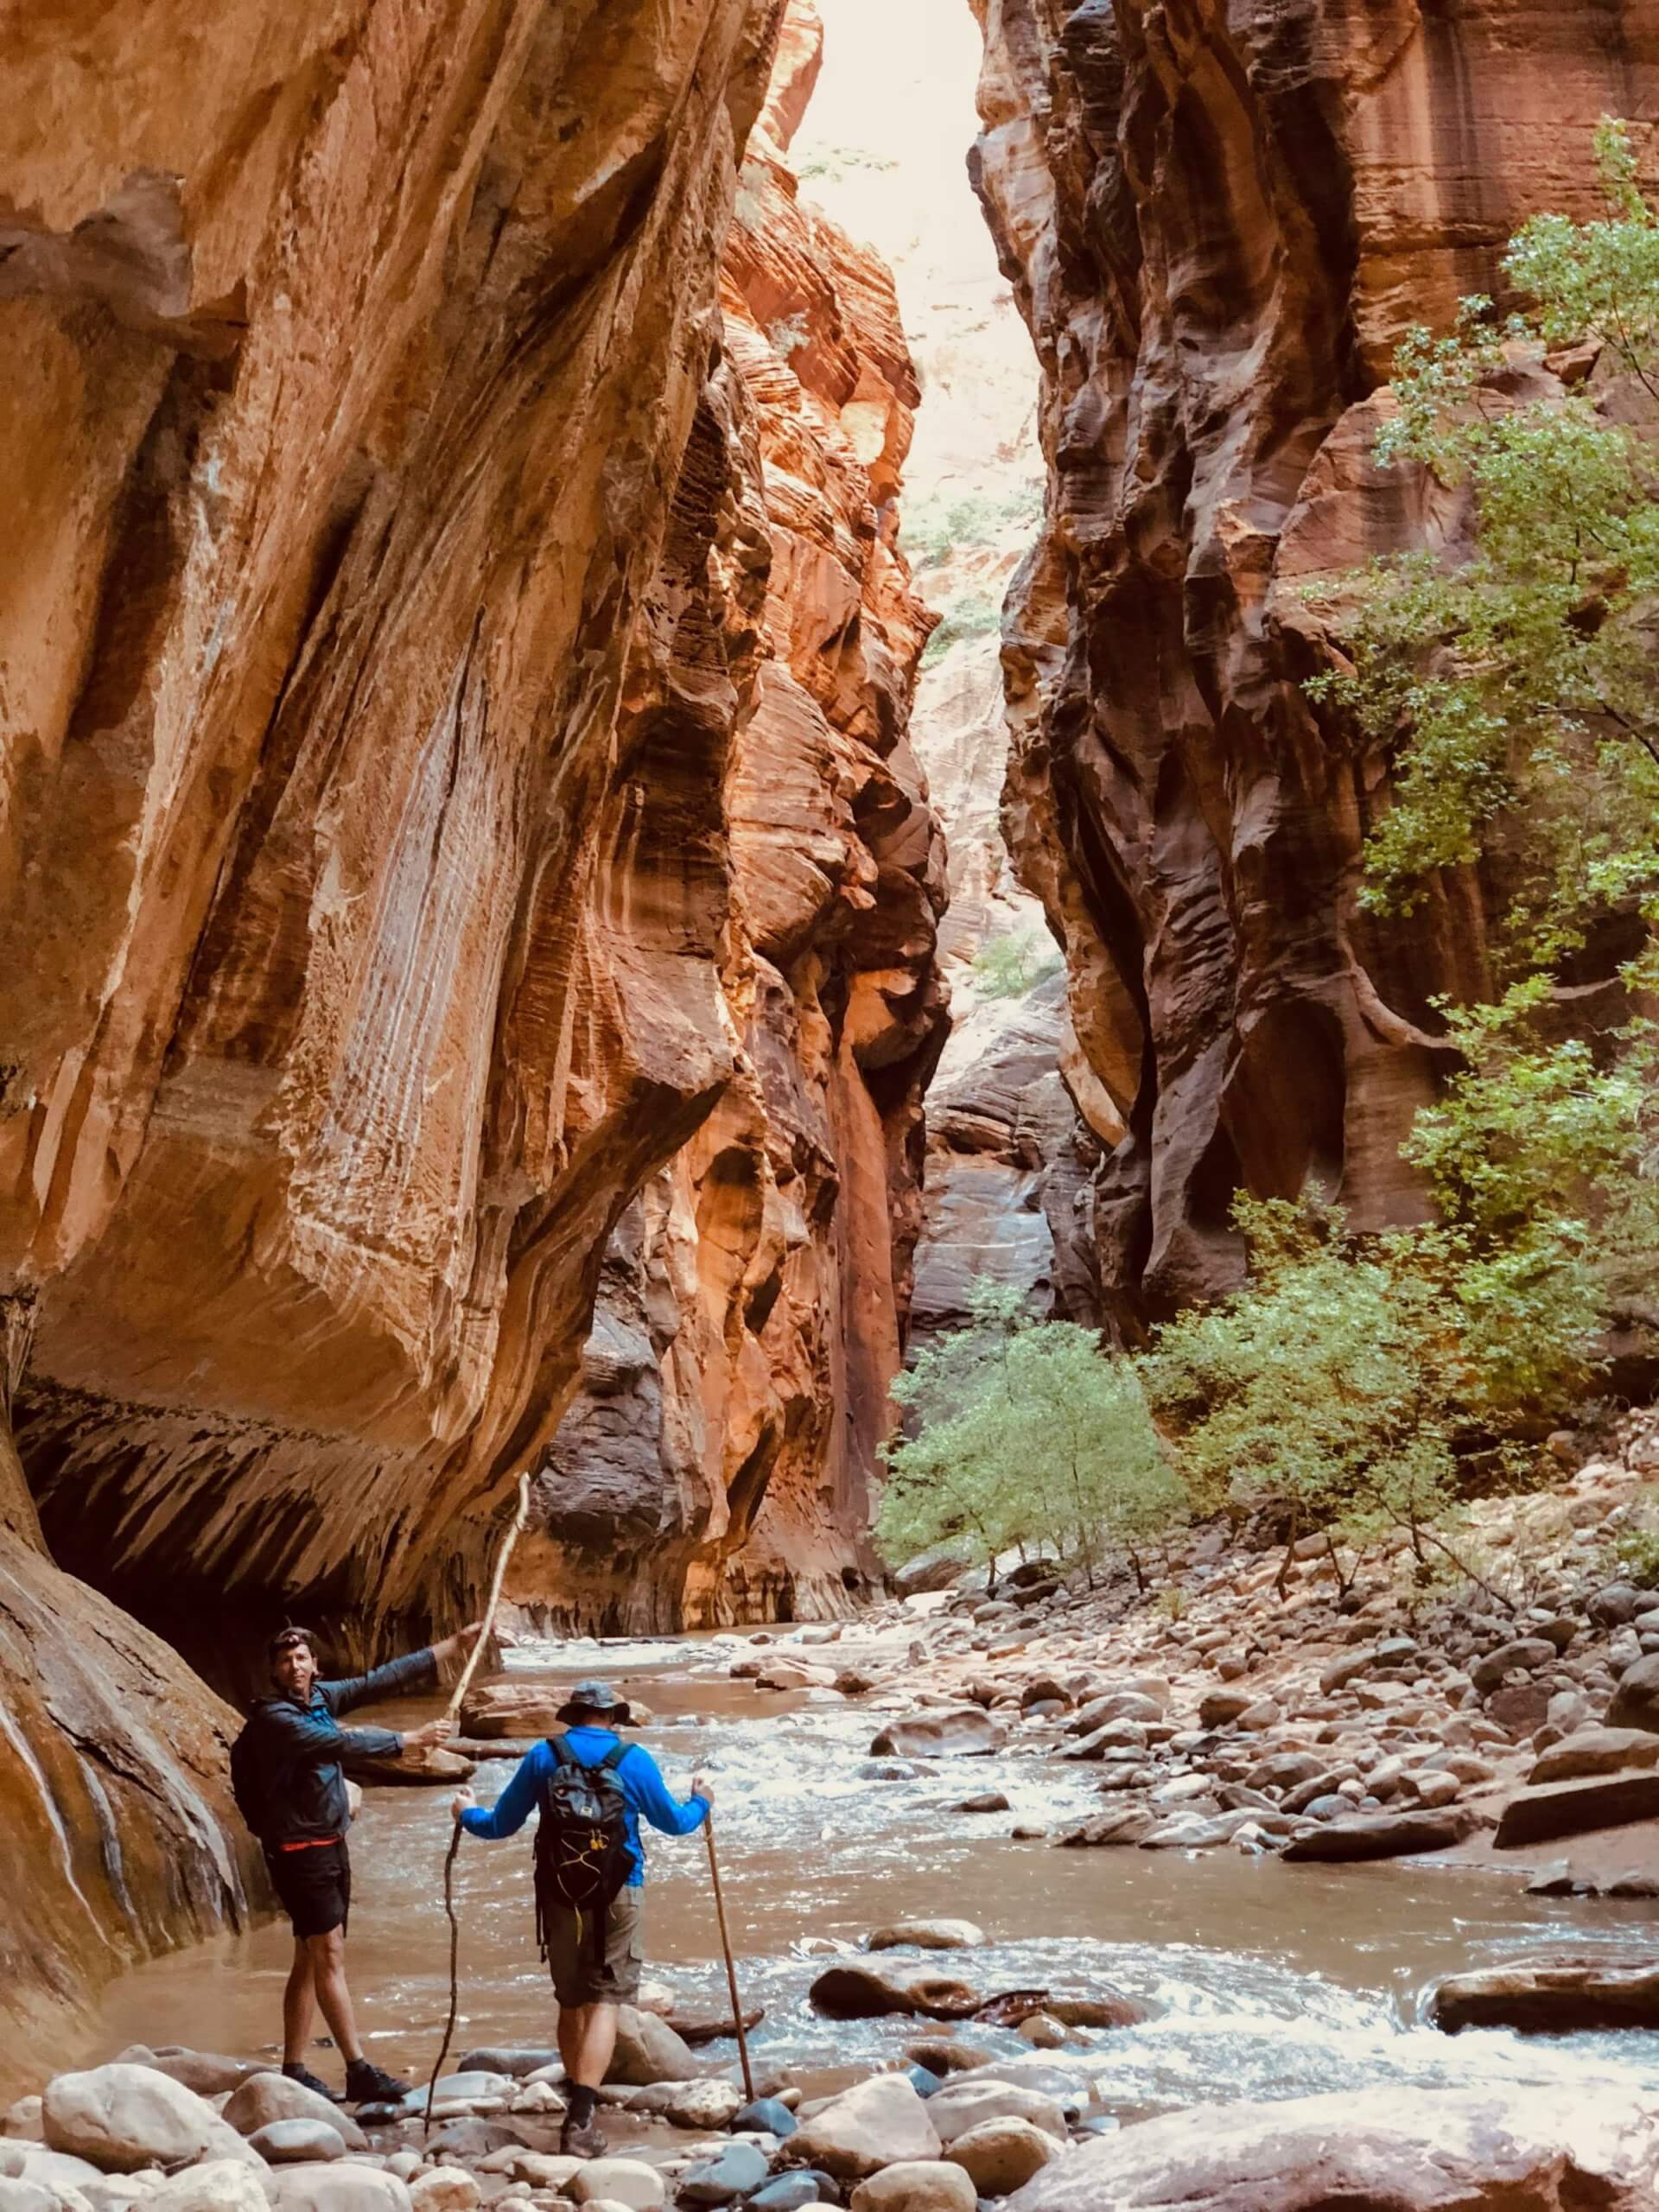
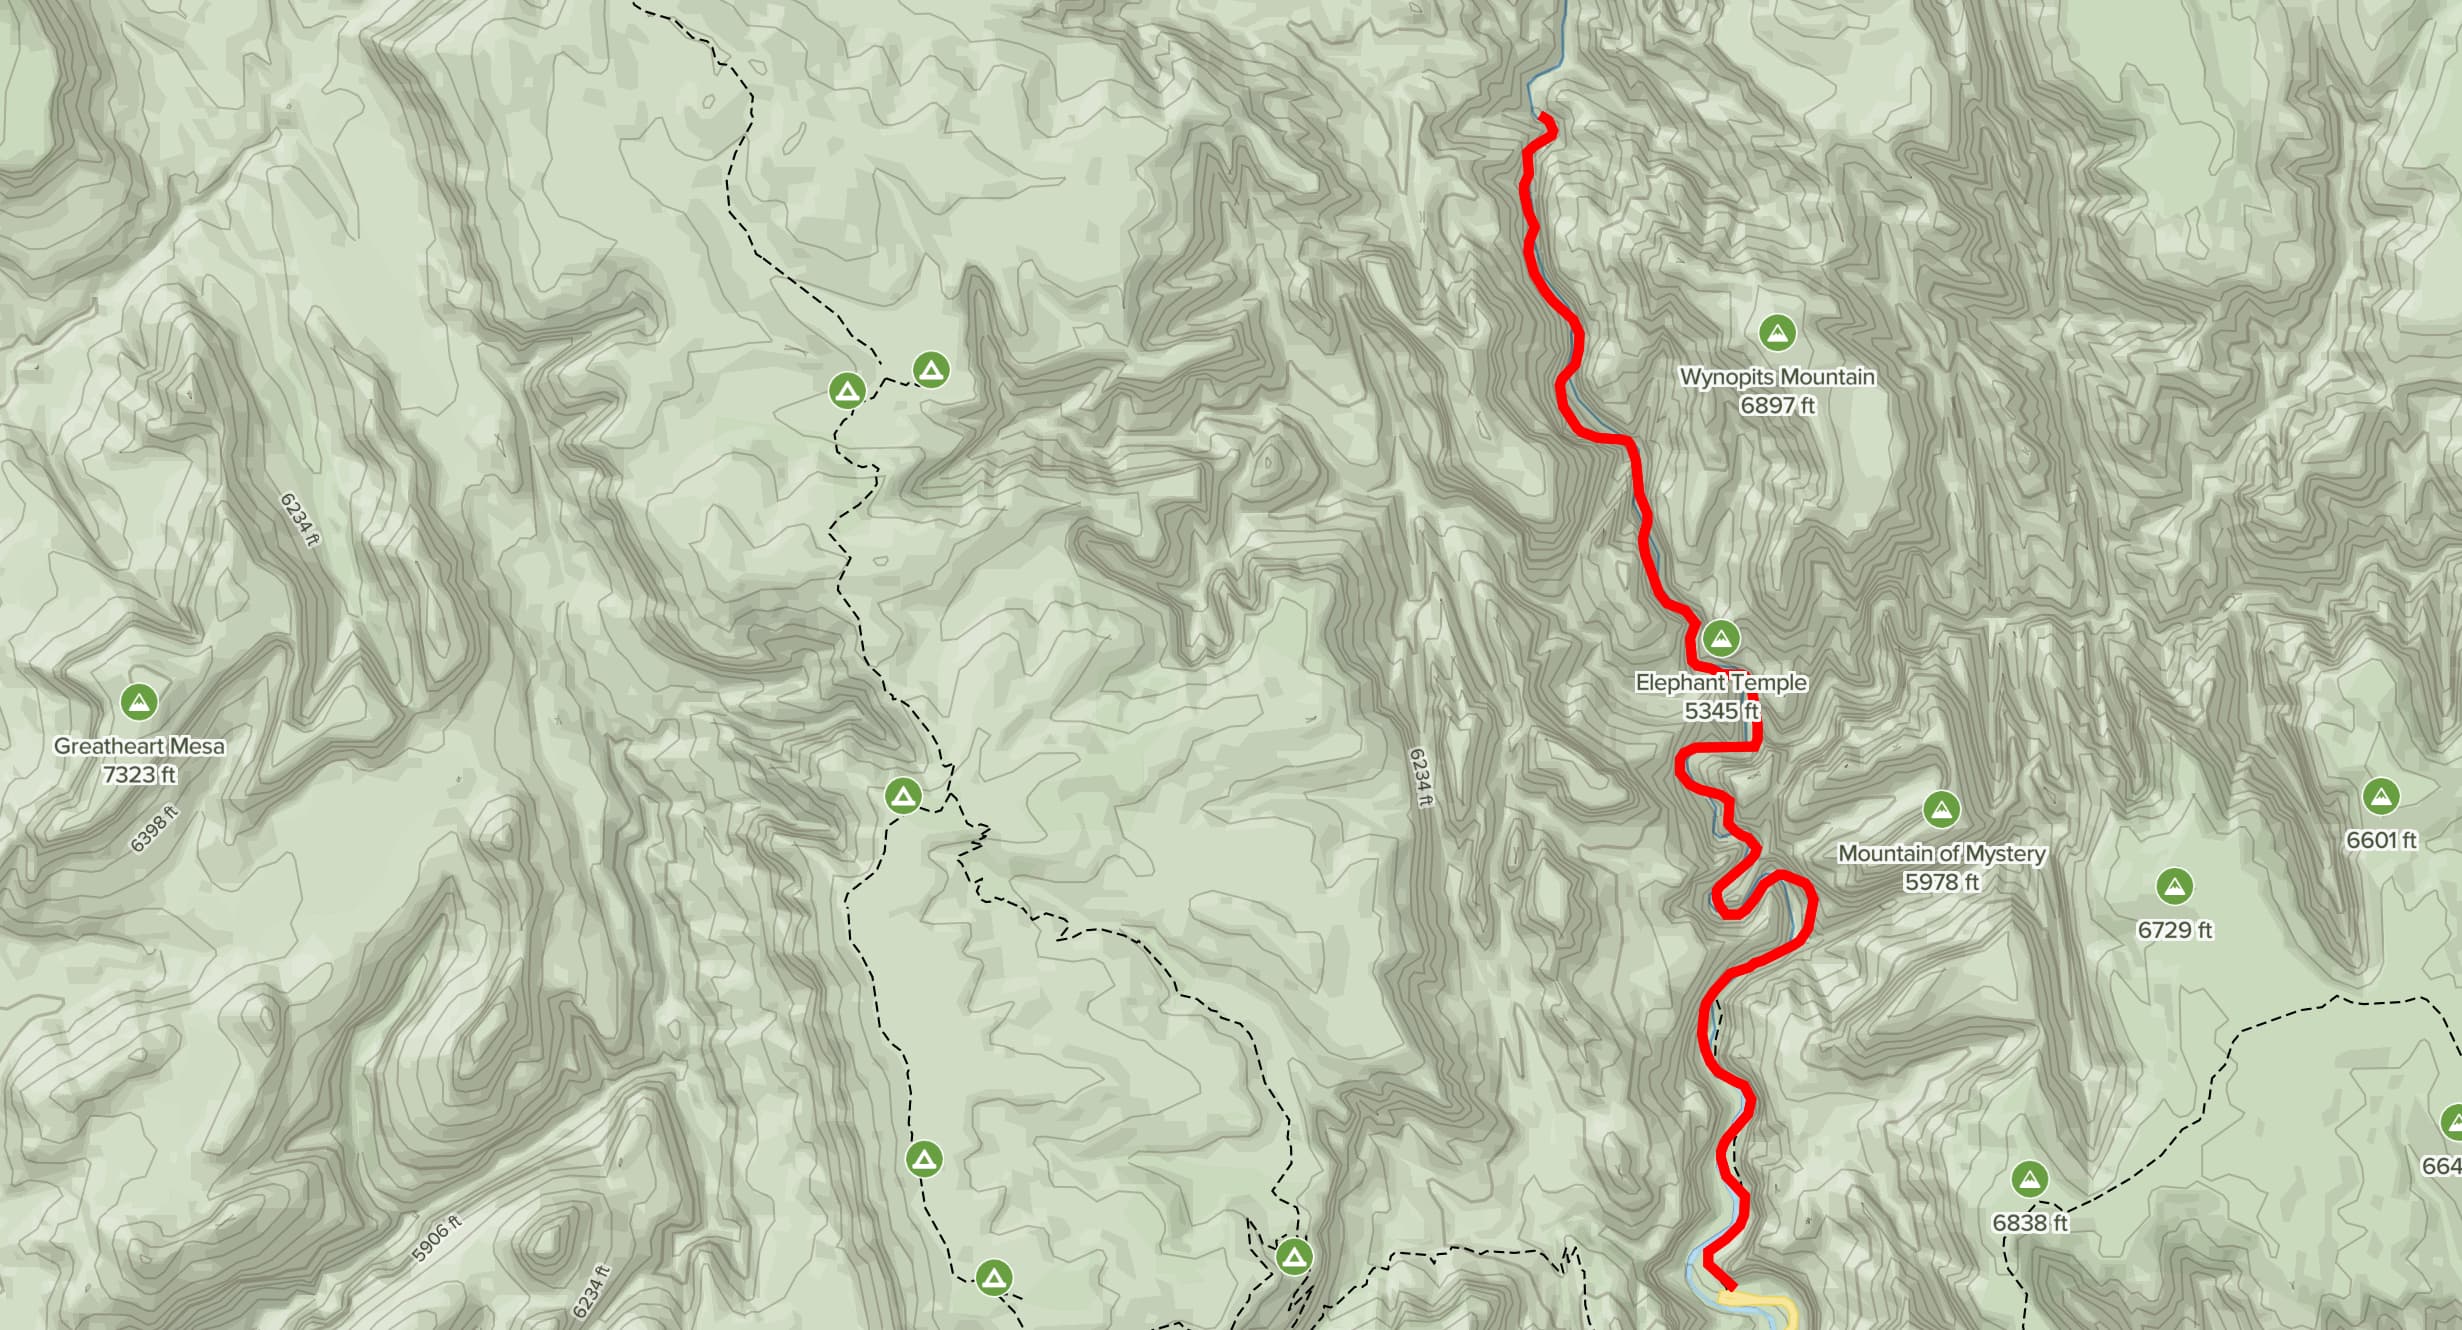
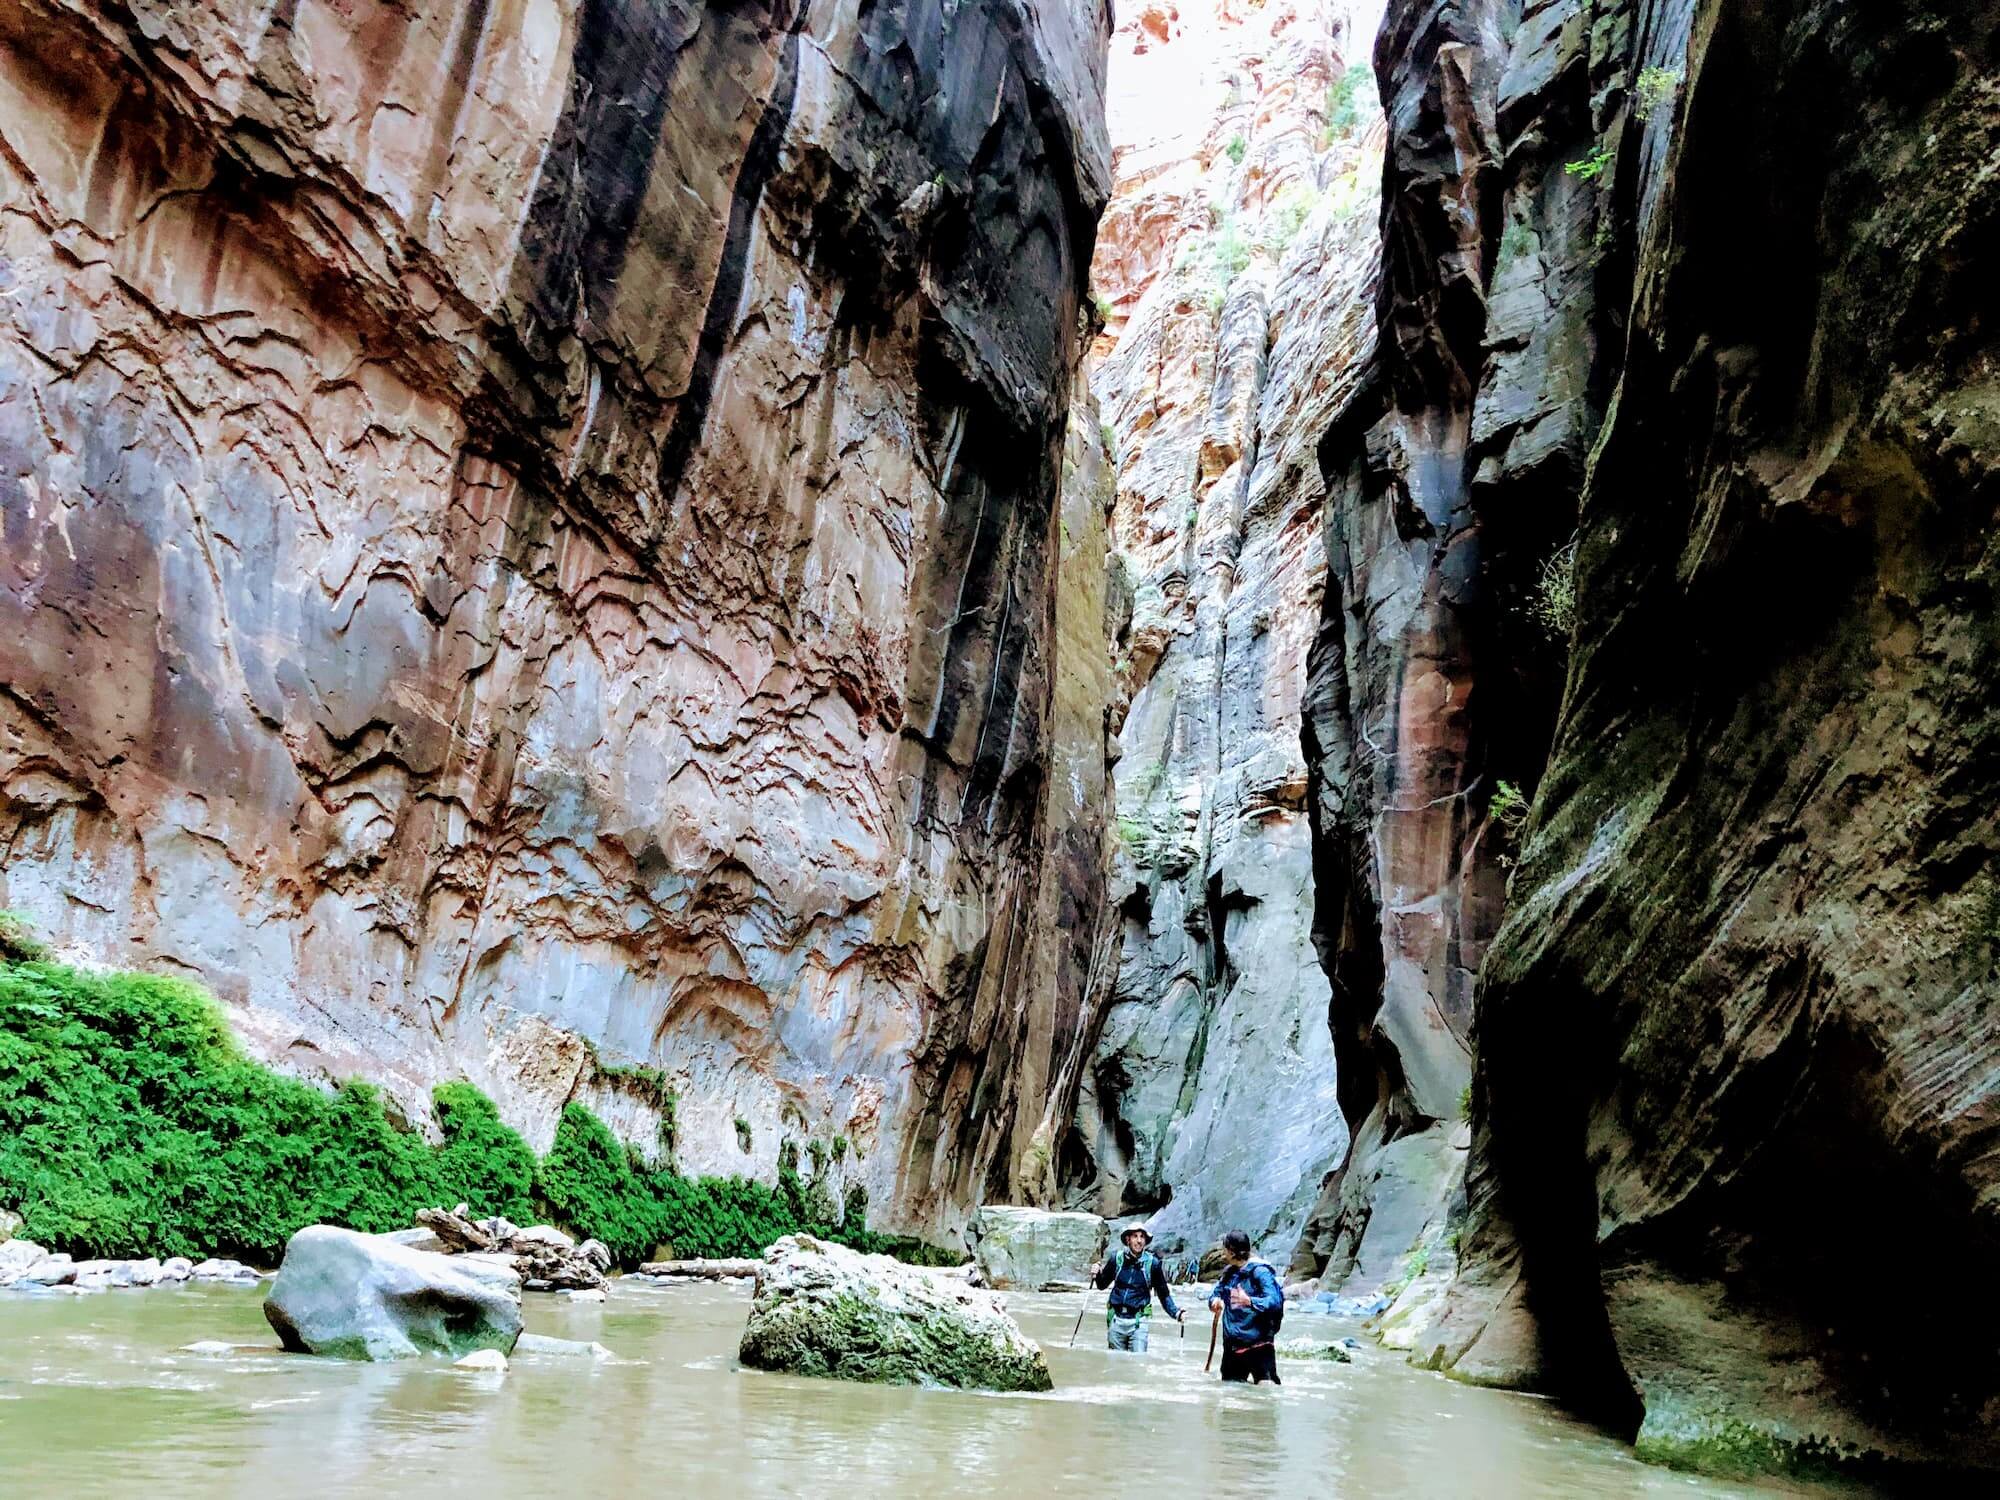
The Narrows is a slot canyon hike up a river. You will be mid-calf deep in water for most of the hike, which under most circumstances sounds miserable, but when you are alone amidst 1,000 foot high walls carved over the ages, is quite the reminder of what a joy it is to get to live.
Because the Narrows is spectacular, it attracts large crowds. If you are on the first shuttle, you will have the place to yourself.
- You need close-toed shoes. The rocks will mess you up if you are wearing sandals. I wore an old pair of running shoes but a lot of people rent shoes (and walking sticks, and pants, and backpacks) from Zion Outfitters. They were closed by the time we got there, and we wanted to do the Narrows on a Friday instead of a Saturday, so we just went with our own gear. Don’t use your normal hiking shoes or boots as they’ll be unusable for the rest of the day.
- Pack lots of water and snacks. It’s an 8 mile out and back hike, but you are moving slowly in the water. It’s 5-6 hours at a minimum unless you decide to turn around early.
- I highly recommend using hiking poles for stabilization. There are a couple dozen wooden hiking sticks at the trailhead, but those go quickly. If you plan on hiking the whole out and back to Big Springs, you’ll be happy you had extra support, as walking on rocks can be difficult when the water is flowing.
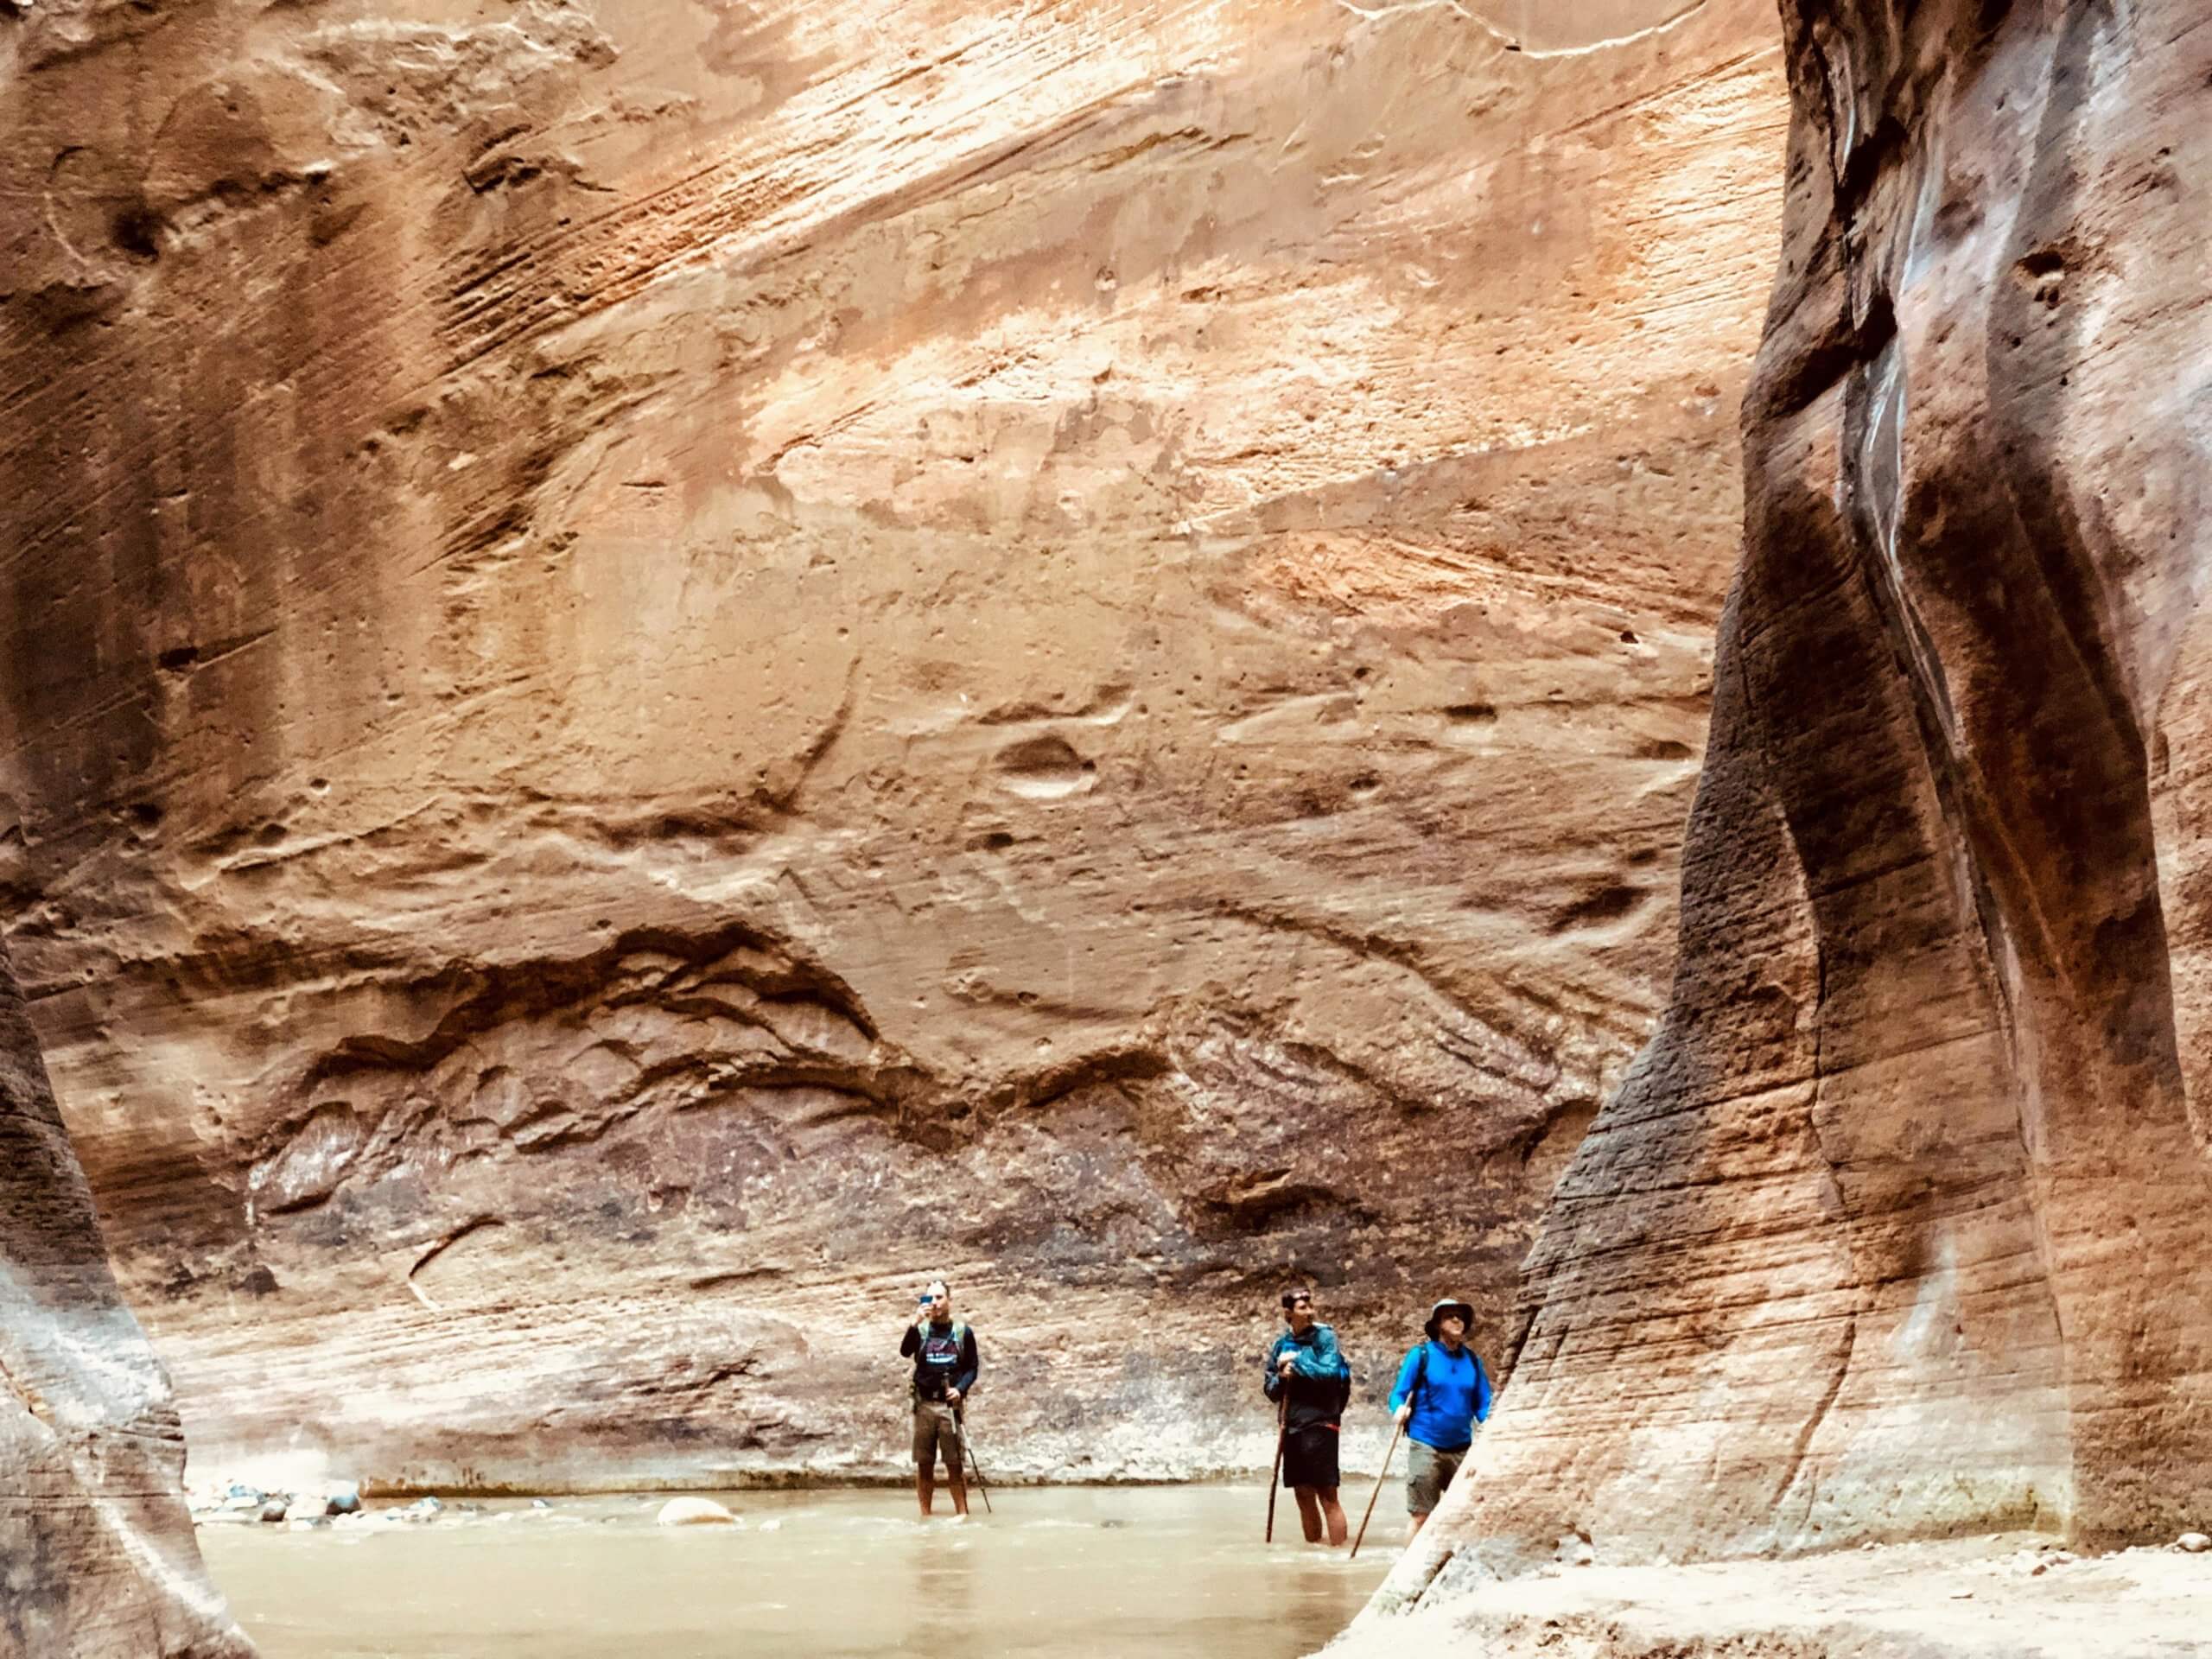
It’s difficult to convey what it feels like to be in the Narrows. It’s just huge. All Zion feels that way, but here, where the walls are just dozens of feet apart, it’s quite an experience. I should note that the water is quite invigoratingly cold. In our September trip, the both air and water temps were in the mid to high 50s. It stung at first, but as we moved more we did get used to it. By the time we were done, it was nearly 80 in the air and the water felt refreshing.
Lunch
We ate at Zion Canyon Brew Pub, which is as close to the park entrance as you can get. Pretty standard brewpub fare, but it tasted delicious after 6-7 hours of continuous effort. After lunch we headed back to the hotel. Though we had been in water all day, it still felt good to get into different water you see. We stayed there until dinner. But you don’t care about pictures of that pool, so here’s one more shot at the Narrows.
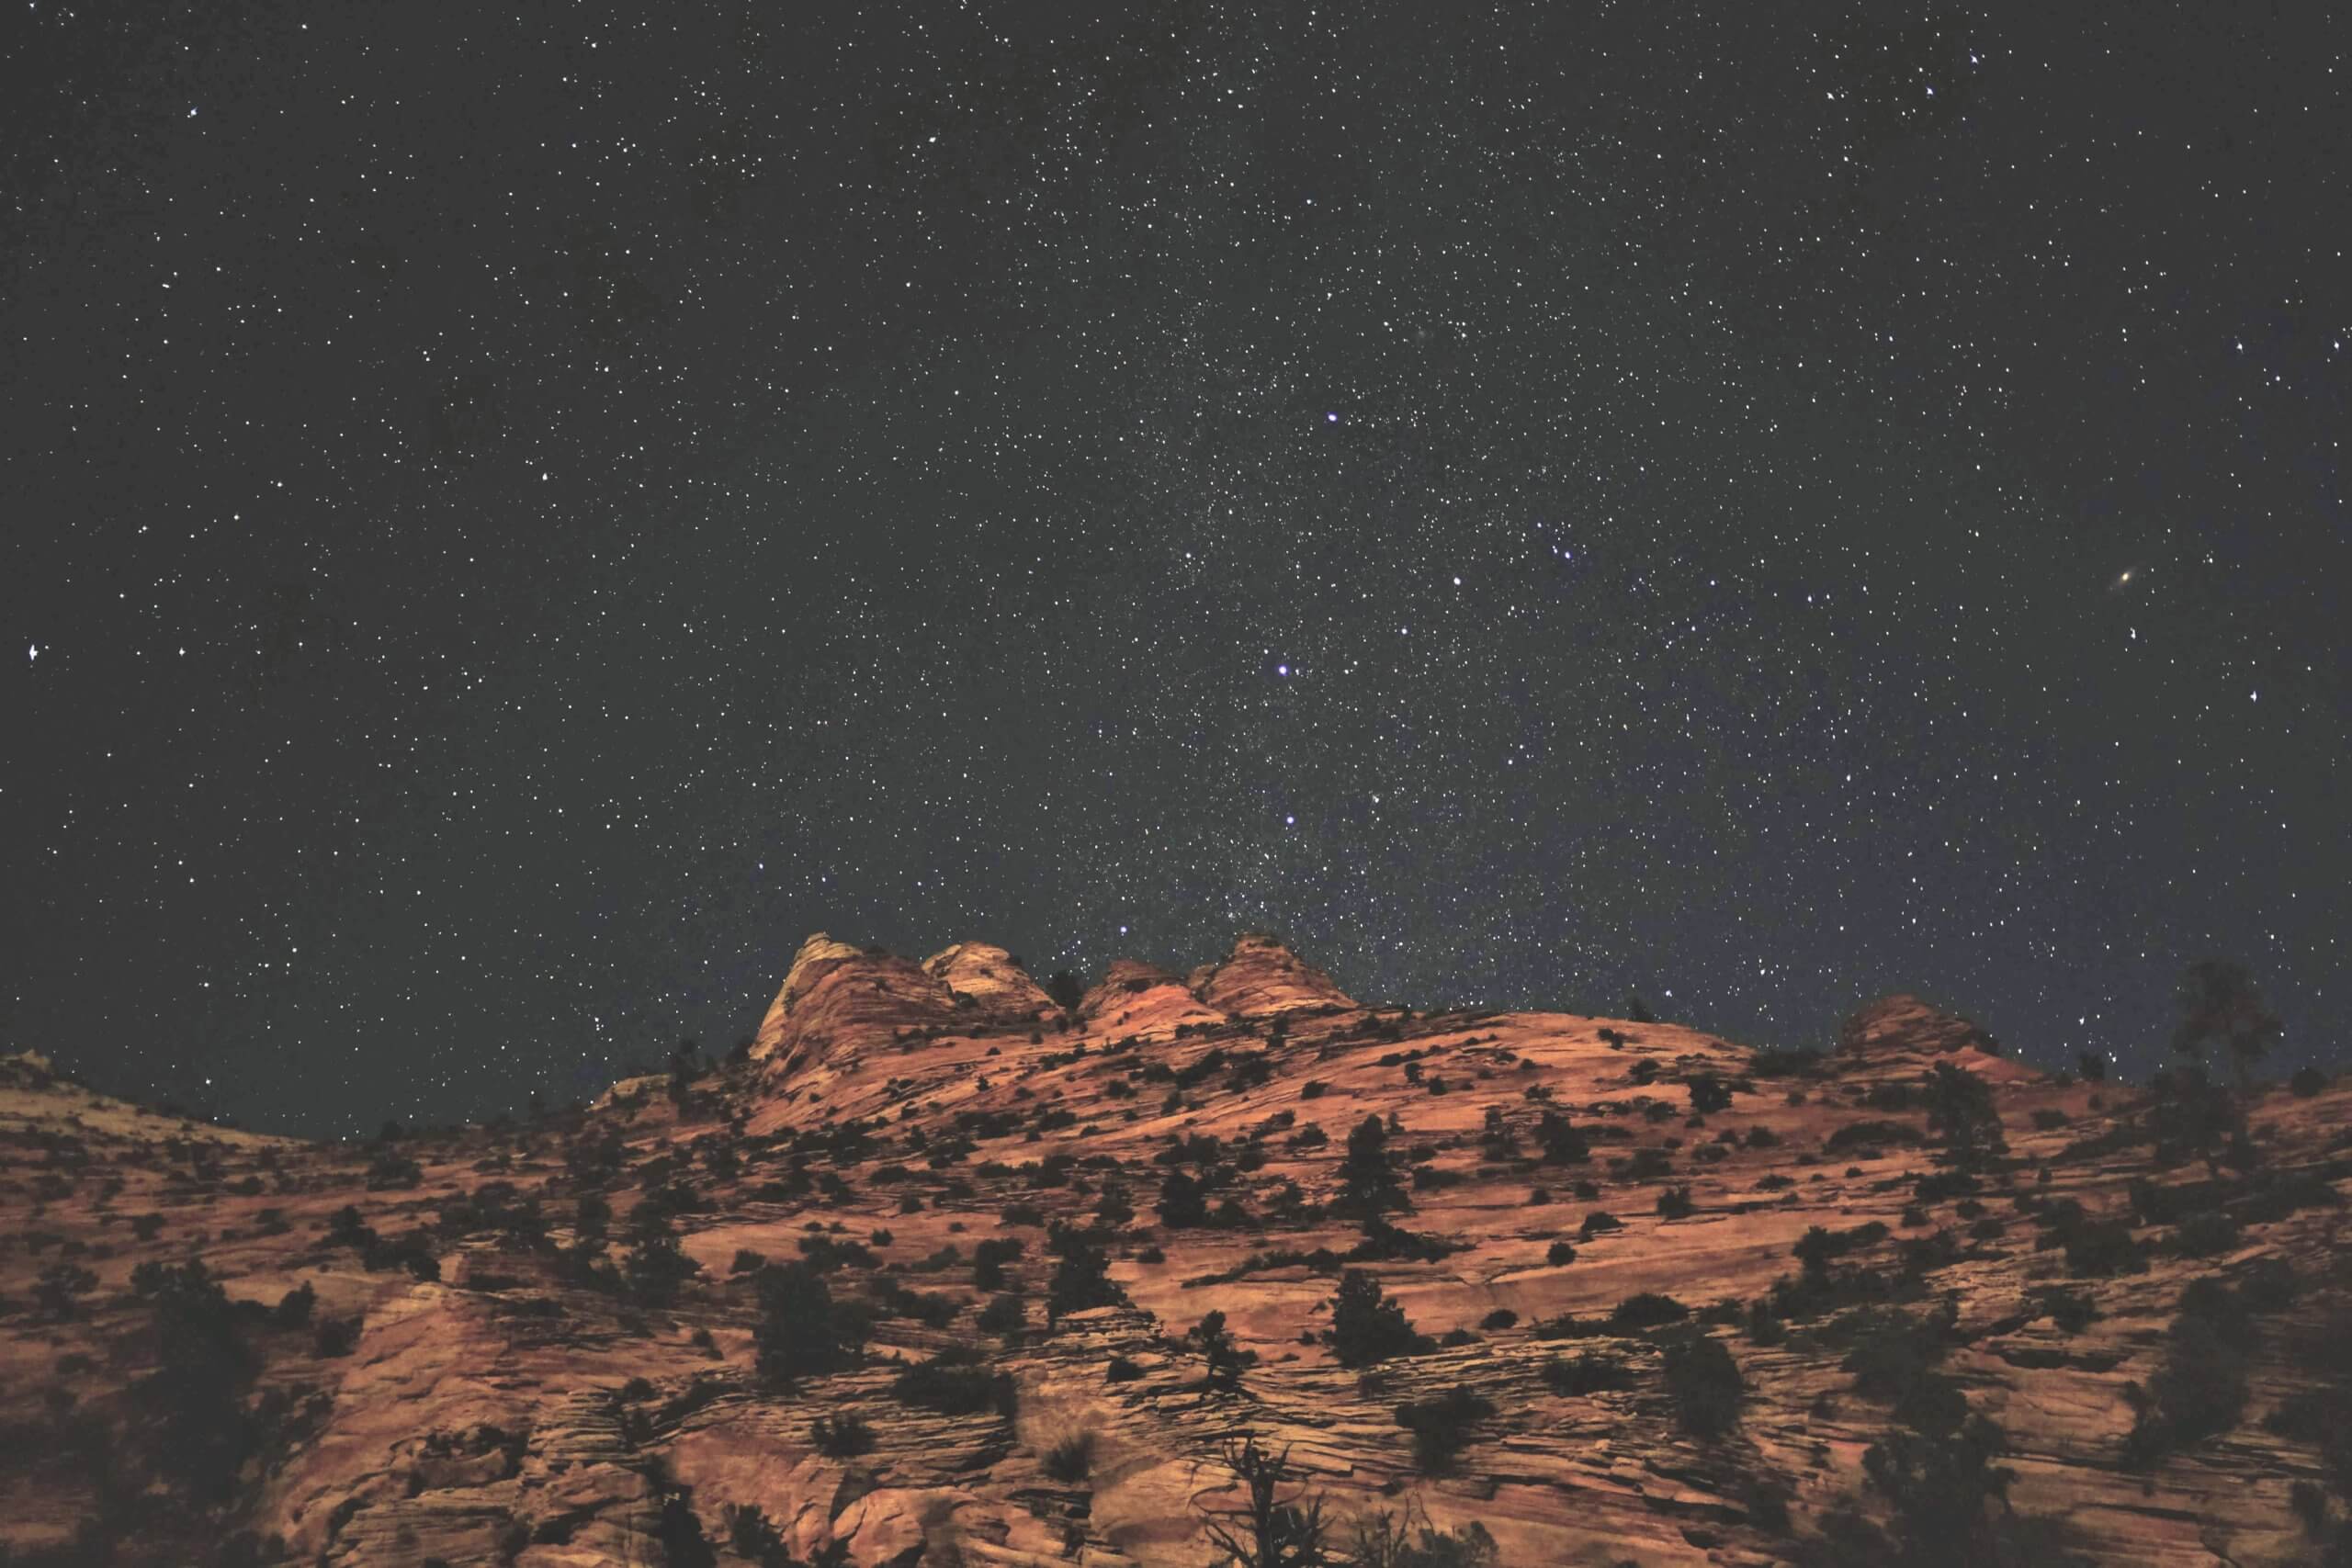
Day 2 Bonus: Dark Skies
If you turn in early, as you might be tempted to do after hiking nine miles in the water then passing out in the sun after one too many Bud Light Limes, you will miss on of Zion’s best features – clear night skies with little-to-no light pollution. To quote the National Park Service,
National parks are some of the few places left in the country to see dark skies, and many are working to protect this endangered resource. The Colorado Plateau Dark Skies Cooperative, a voluntary partnership of agencies, communities, and individuals, was formed in 2013 to celebrate and protect the exceptional night skies found in this region. Zion National Park has installed night-friendly fixtures at the Zion Canyon Visitor Center, Zion Human History Museum, and Zion Lodge that direct light downward instead of casting it upward into the sky. Visitors are encouraged to take advantage of dark skies while in the park – on any clear night, head outside and look skyward to see views that rival the daytime scenery that Zion is known for.
Since you can drive in the park at night, we headed back up to the Canyon Overlook Trail to get a little solitude and to photograph the clear skies. The moon was pretty bright that night, but it’s remarkable how much of the sky we can’t see due to the light around us. Make time one night to find a quiet, dark place and just look up for an hour or two.
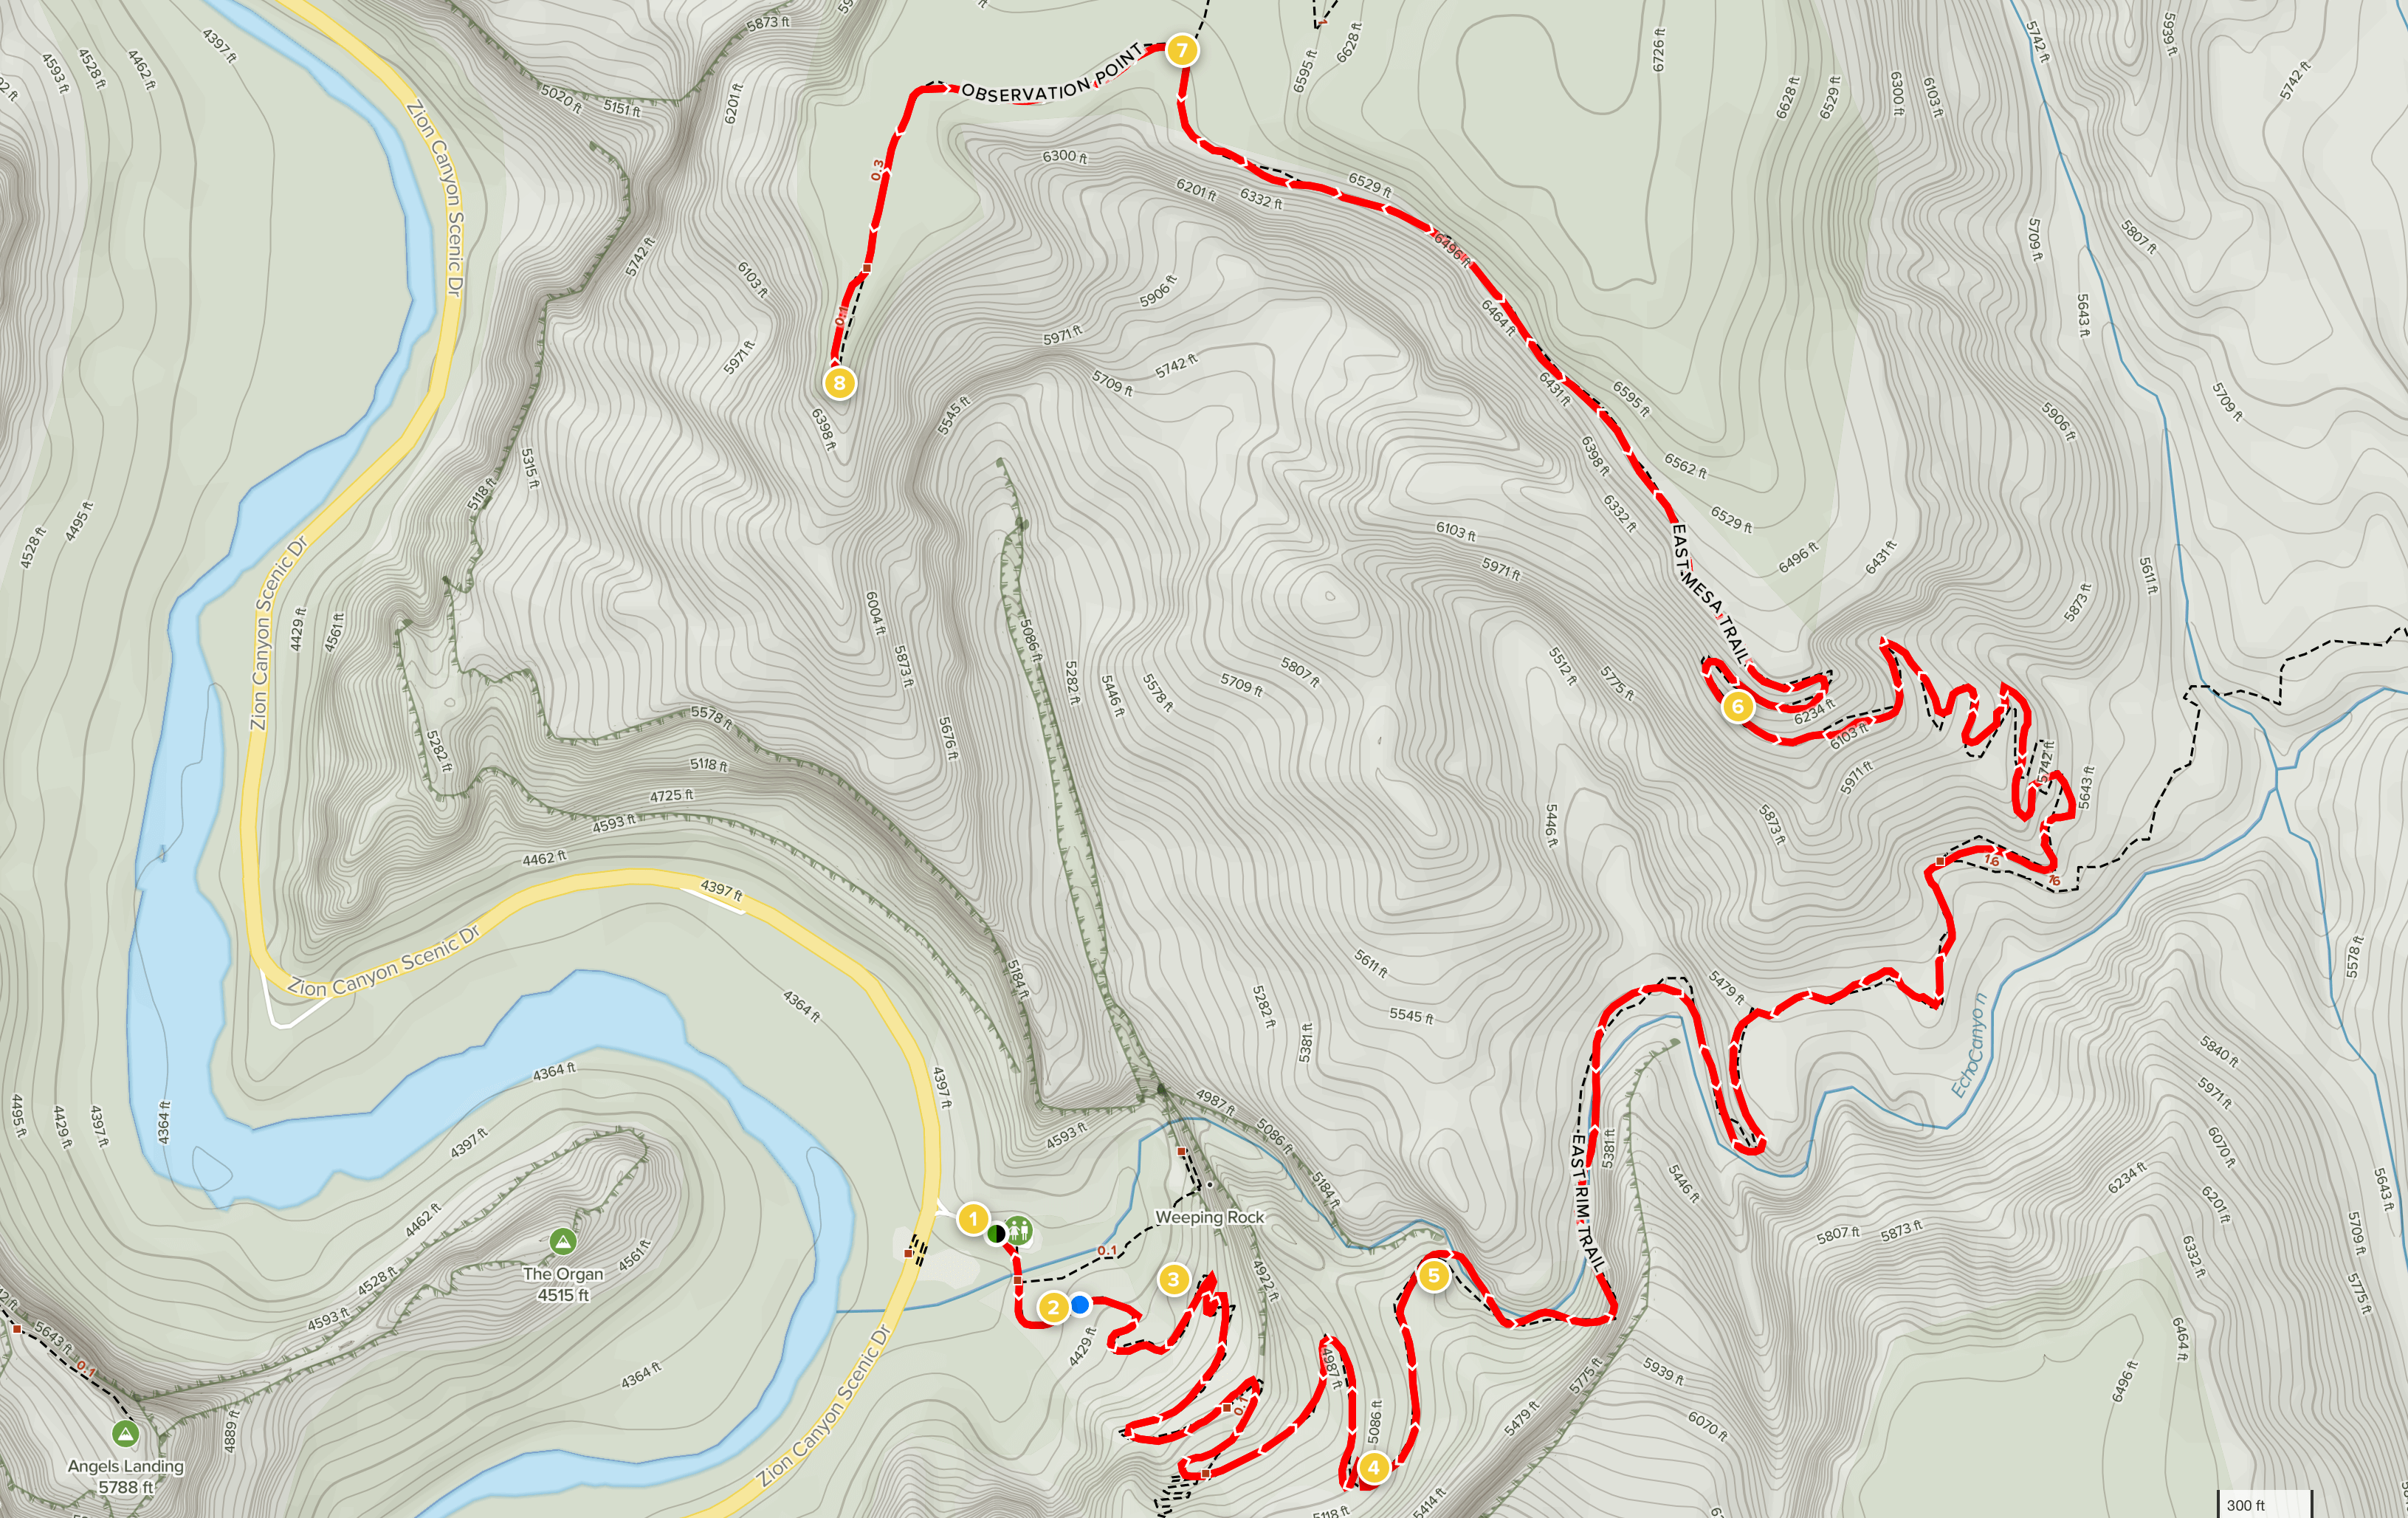
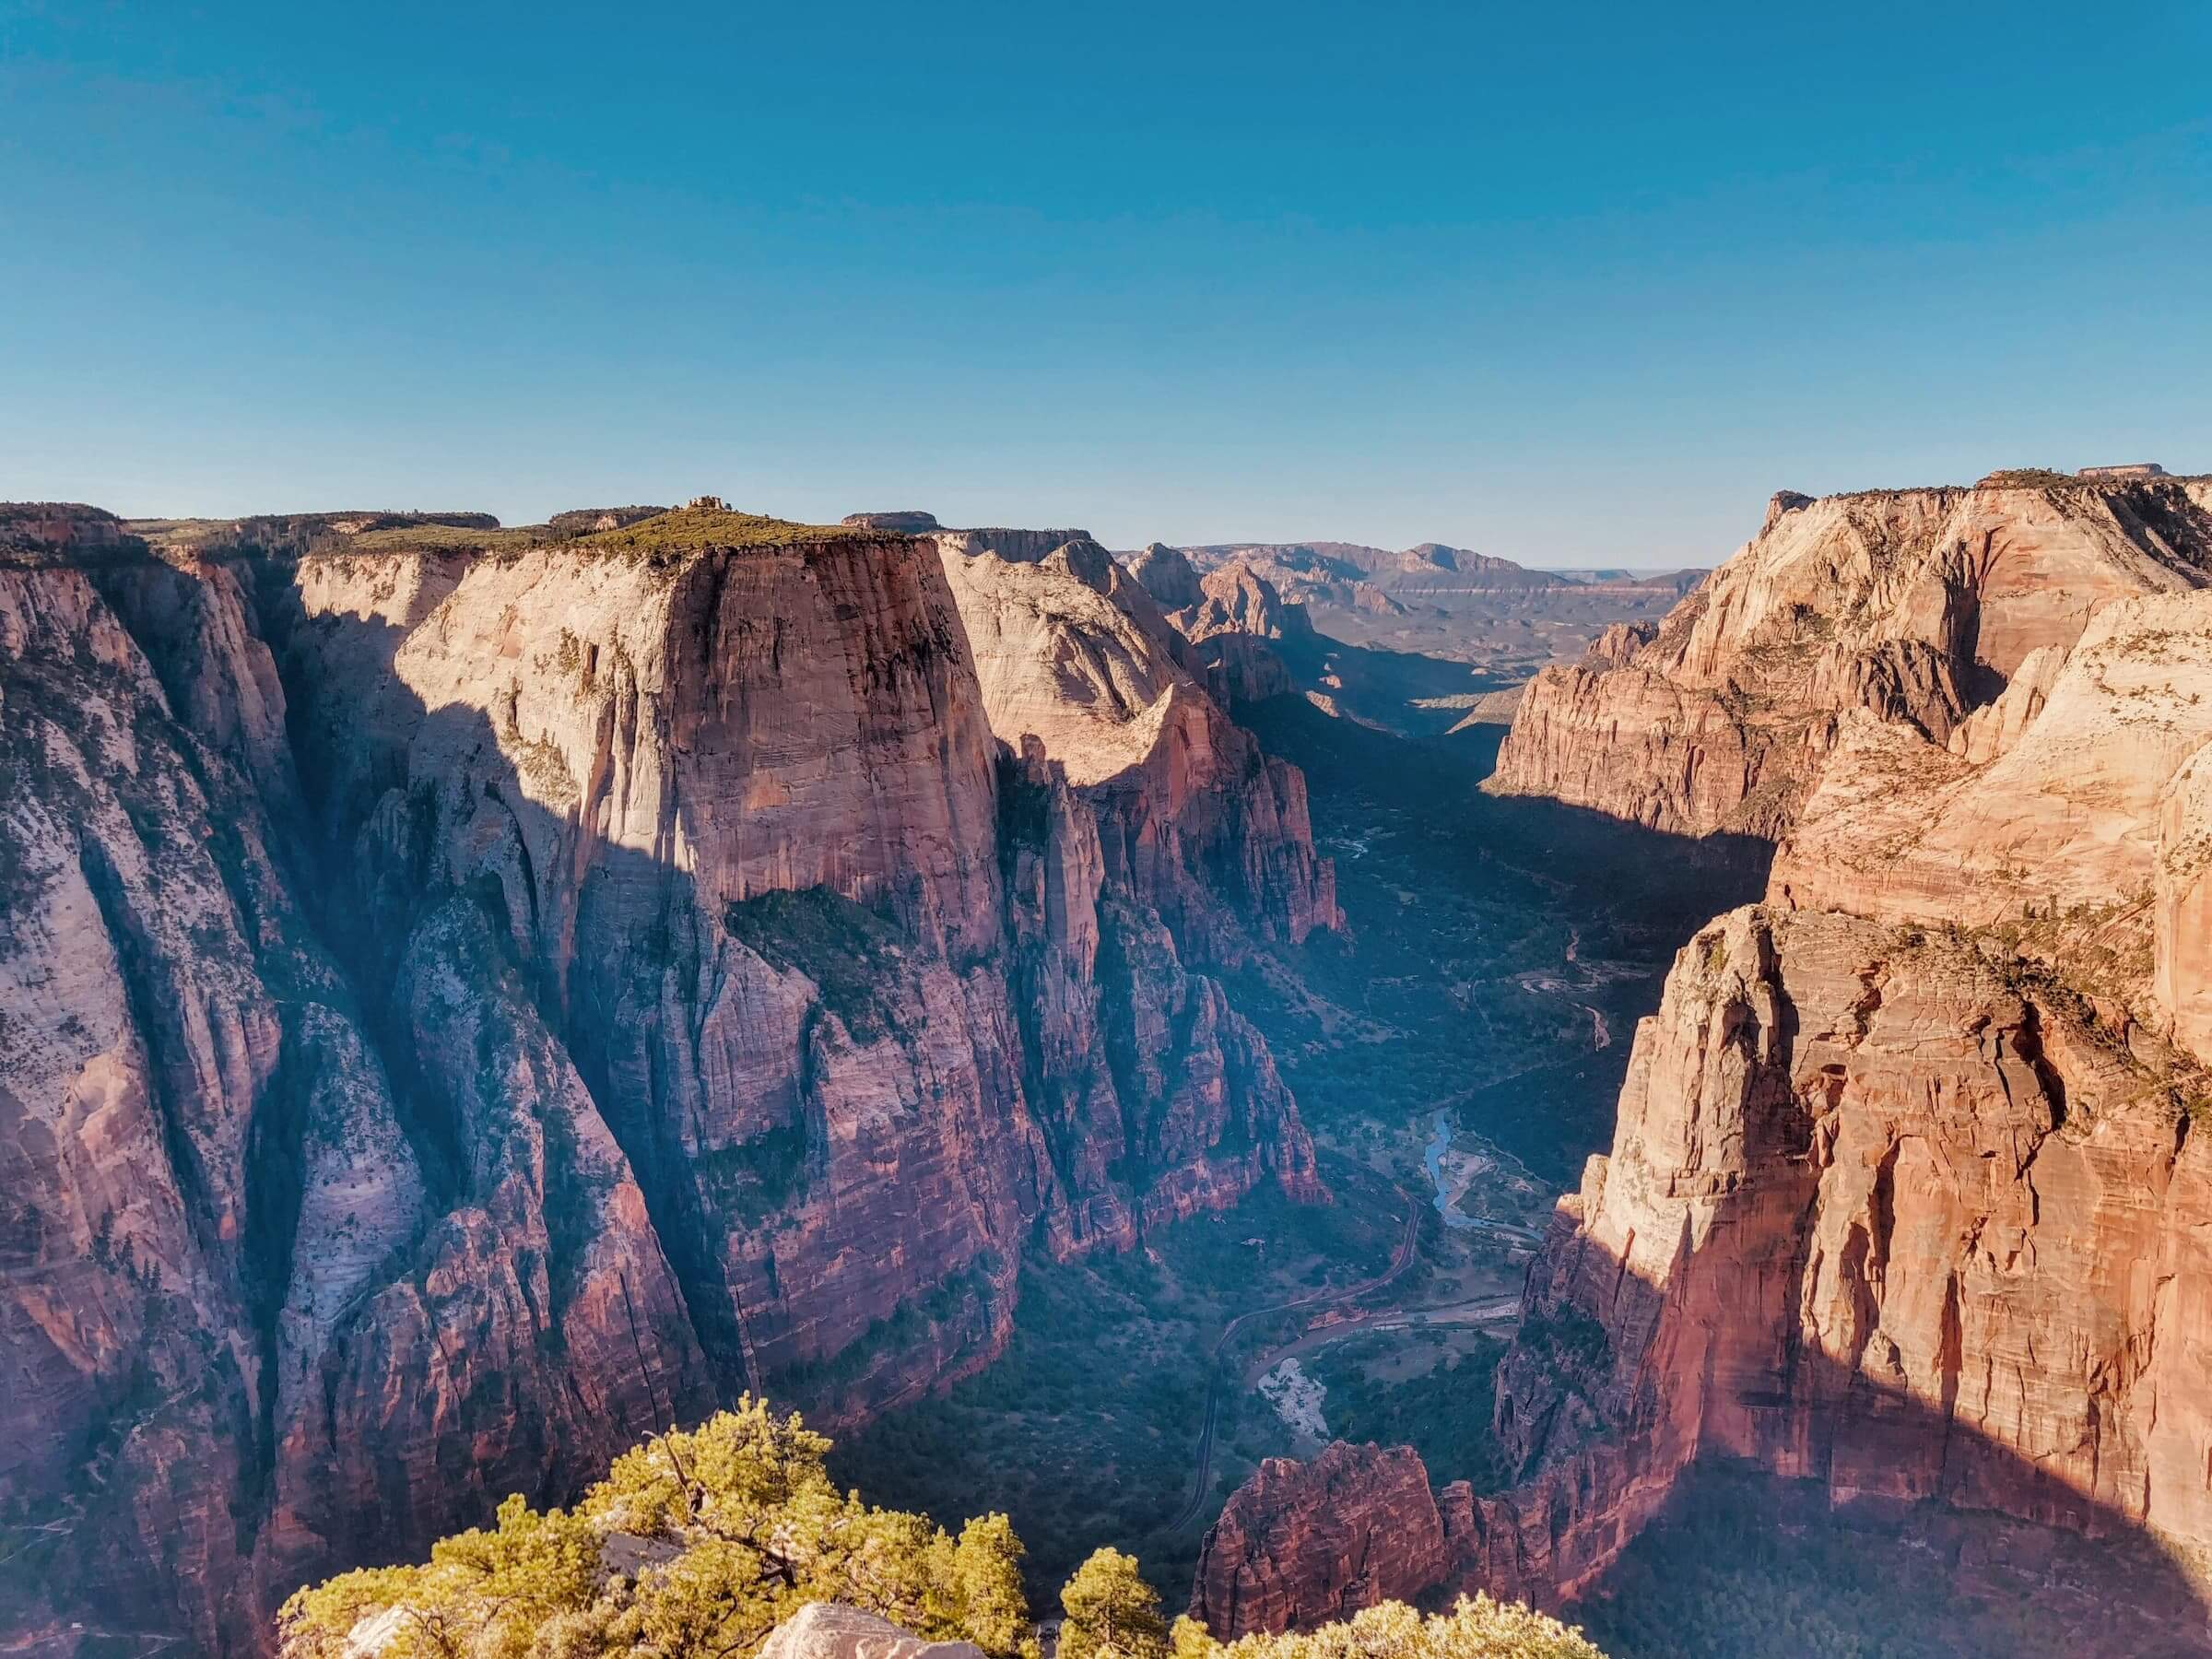
Day 3: Observation Point Hike
There are two big “view” hikes in Zion: Angel’s Landing, a 4.4 mile out and back, 1,600 feet up a rock formation that stands out in the middle of the canyon that is so sketchy at the end that the route has chains on it so people don’t fall, and Observation Point, an 8 mile out and back with 2,400 feet of elevation gain that looks 1,000 feet on Angel’s Landing.
Both are among the highest rated hikes in the US, but Angel’s Landing was closed when we were there, so we chose to do Observation Point. From all that I’ve read, Angel’s Landing is more exciting, and quite a bit more exposed, but the views from Observation are larger. Indeed, Angel’s Landing looks small to the South and West of Observation Point.
As luck would have it, Observation Point via the route described below is closed as of May 2021 because of some significant rockfall that has also affected Hidden Canyon and Weeping Rock.
If it’s going to be warm, you will want to start this hike early. It got nearly 30 degrees warmer during the hike and unlike in the Narrows, you are exposed to the sun for much of your effort. Having a good hat helps, but starting early does too.
Your hike begins at the Weeping Rock Trailhead, just East of Angel’s Landing above you. The hike begins with a pretty aggressive set of switchbacks that will gain you 700 feet of elevation pretty quickly before you cut over onto the East Rim Trail. Here’ you’ll run into a really wonderful section called Echo Canyon. It’s a convergence of walls that you have to cut through. The closer you are to Zion’s walls, the better you get a sense for just how big and tall they are. It’s a hundred or more feet across but it feels like you are in a hole.
Echo Canyon Passage is a great place to take a little break for some water and some rest. After that you’ll climb out and be heading generally East. Depending on how early you got started, the sun will make its way over the hills and start to warm you considerably.
After a relatively steady climb along the East Rim Trail, you’ll turn left and start up what I found to be the hardest part of the hike – another stretch of tight switchbacks almost completely exposed to the sun. I was very glad at that point that I had a full-brimmed hat, but it felt very hot, and at that point it was perhaps only 75 degrees. I can’t imagine what people who were climbing it several hours later felt.
The top of the switchbacks really gives you a great view, and it’s the most exposed part of the hike. But once you are done, the hardest part is over. At that point, you’ll have a long slog back West, with your summit in plain view. The sun is less of a factor as well so you’ll be free to enjoy the view getting slowly better off to your left as you head up.
After a mile or so you’ll come to a T. If you go right you’ll exit the park, which you probably don’t want to do. There is, I should note, a “back way” to the Observation Point along the East Mesa Trail. More info on that here if you’d prefer not to brave the climb. Turn LEFT at the T and within a few minutes you’ll approach the summit and the views below. We spent probably 45 minutes up there soaking in the views and watching people take very elaborate selfies before heading back down. It takes probably half as much time going back as going up.
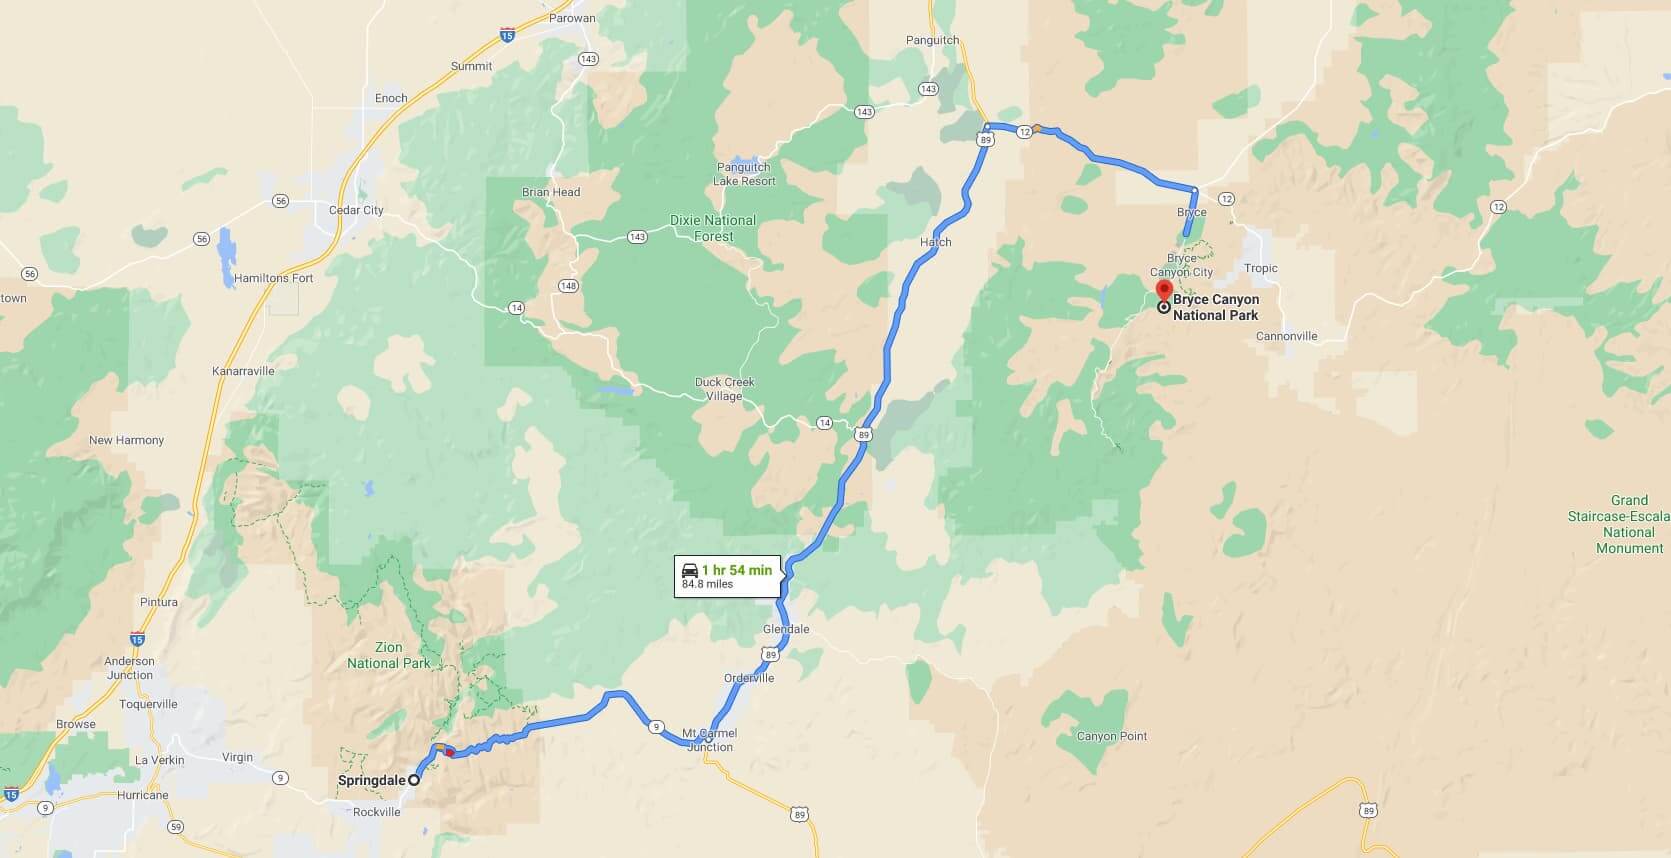
Day 4 : To Bryce Canyon and Back
For several hours after returning to the hotel after Observation Point, we sat more or less catatonic in the pool and hot tub. There we met (as one does), the founder of a large affinity credit card company who convinced us to hop in the car and go to Bryce Canyon National Park. We had planned on hitting the Subway slot canyon hike, but that was closed at the time, so Bryce was an appealing change of scenery.
It’s only around two hours away, and the drive is quite pretty, curving up through the park on a steady climb to Bryce. If you’ve ever heard the term Grand Staircase and wondered what it was about, consider that the bottom elevation of Bryce Canyon is roughly the top of Zion, and the bottom of Zion is roughly the top of the Grand Canyon. The whole continent steps down, though the elevation changes are subtle enough you hardly notice them in the car.
Unlike Zion, which you drive into, you’ll arrive above Bryce Canyon. We were only there for the day, so we parked and walked to the edge. Bryce is much smaller than Zion, and it’s more accessible and easier to get around. It’s worth spending some time up along the edge – that’s what a lot of people only do. Bryce looks like it’s something from another planet.
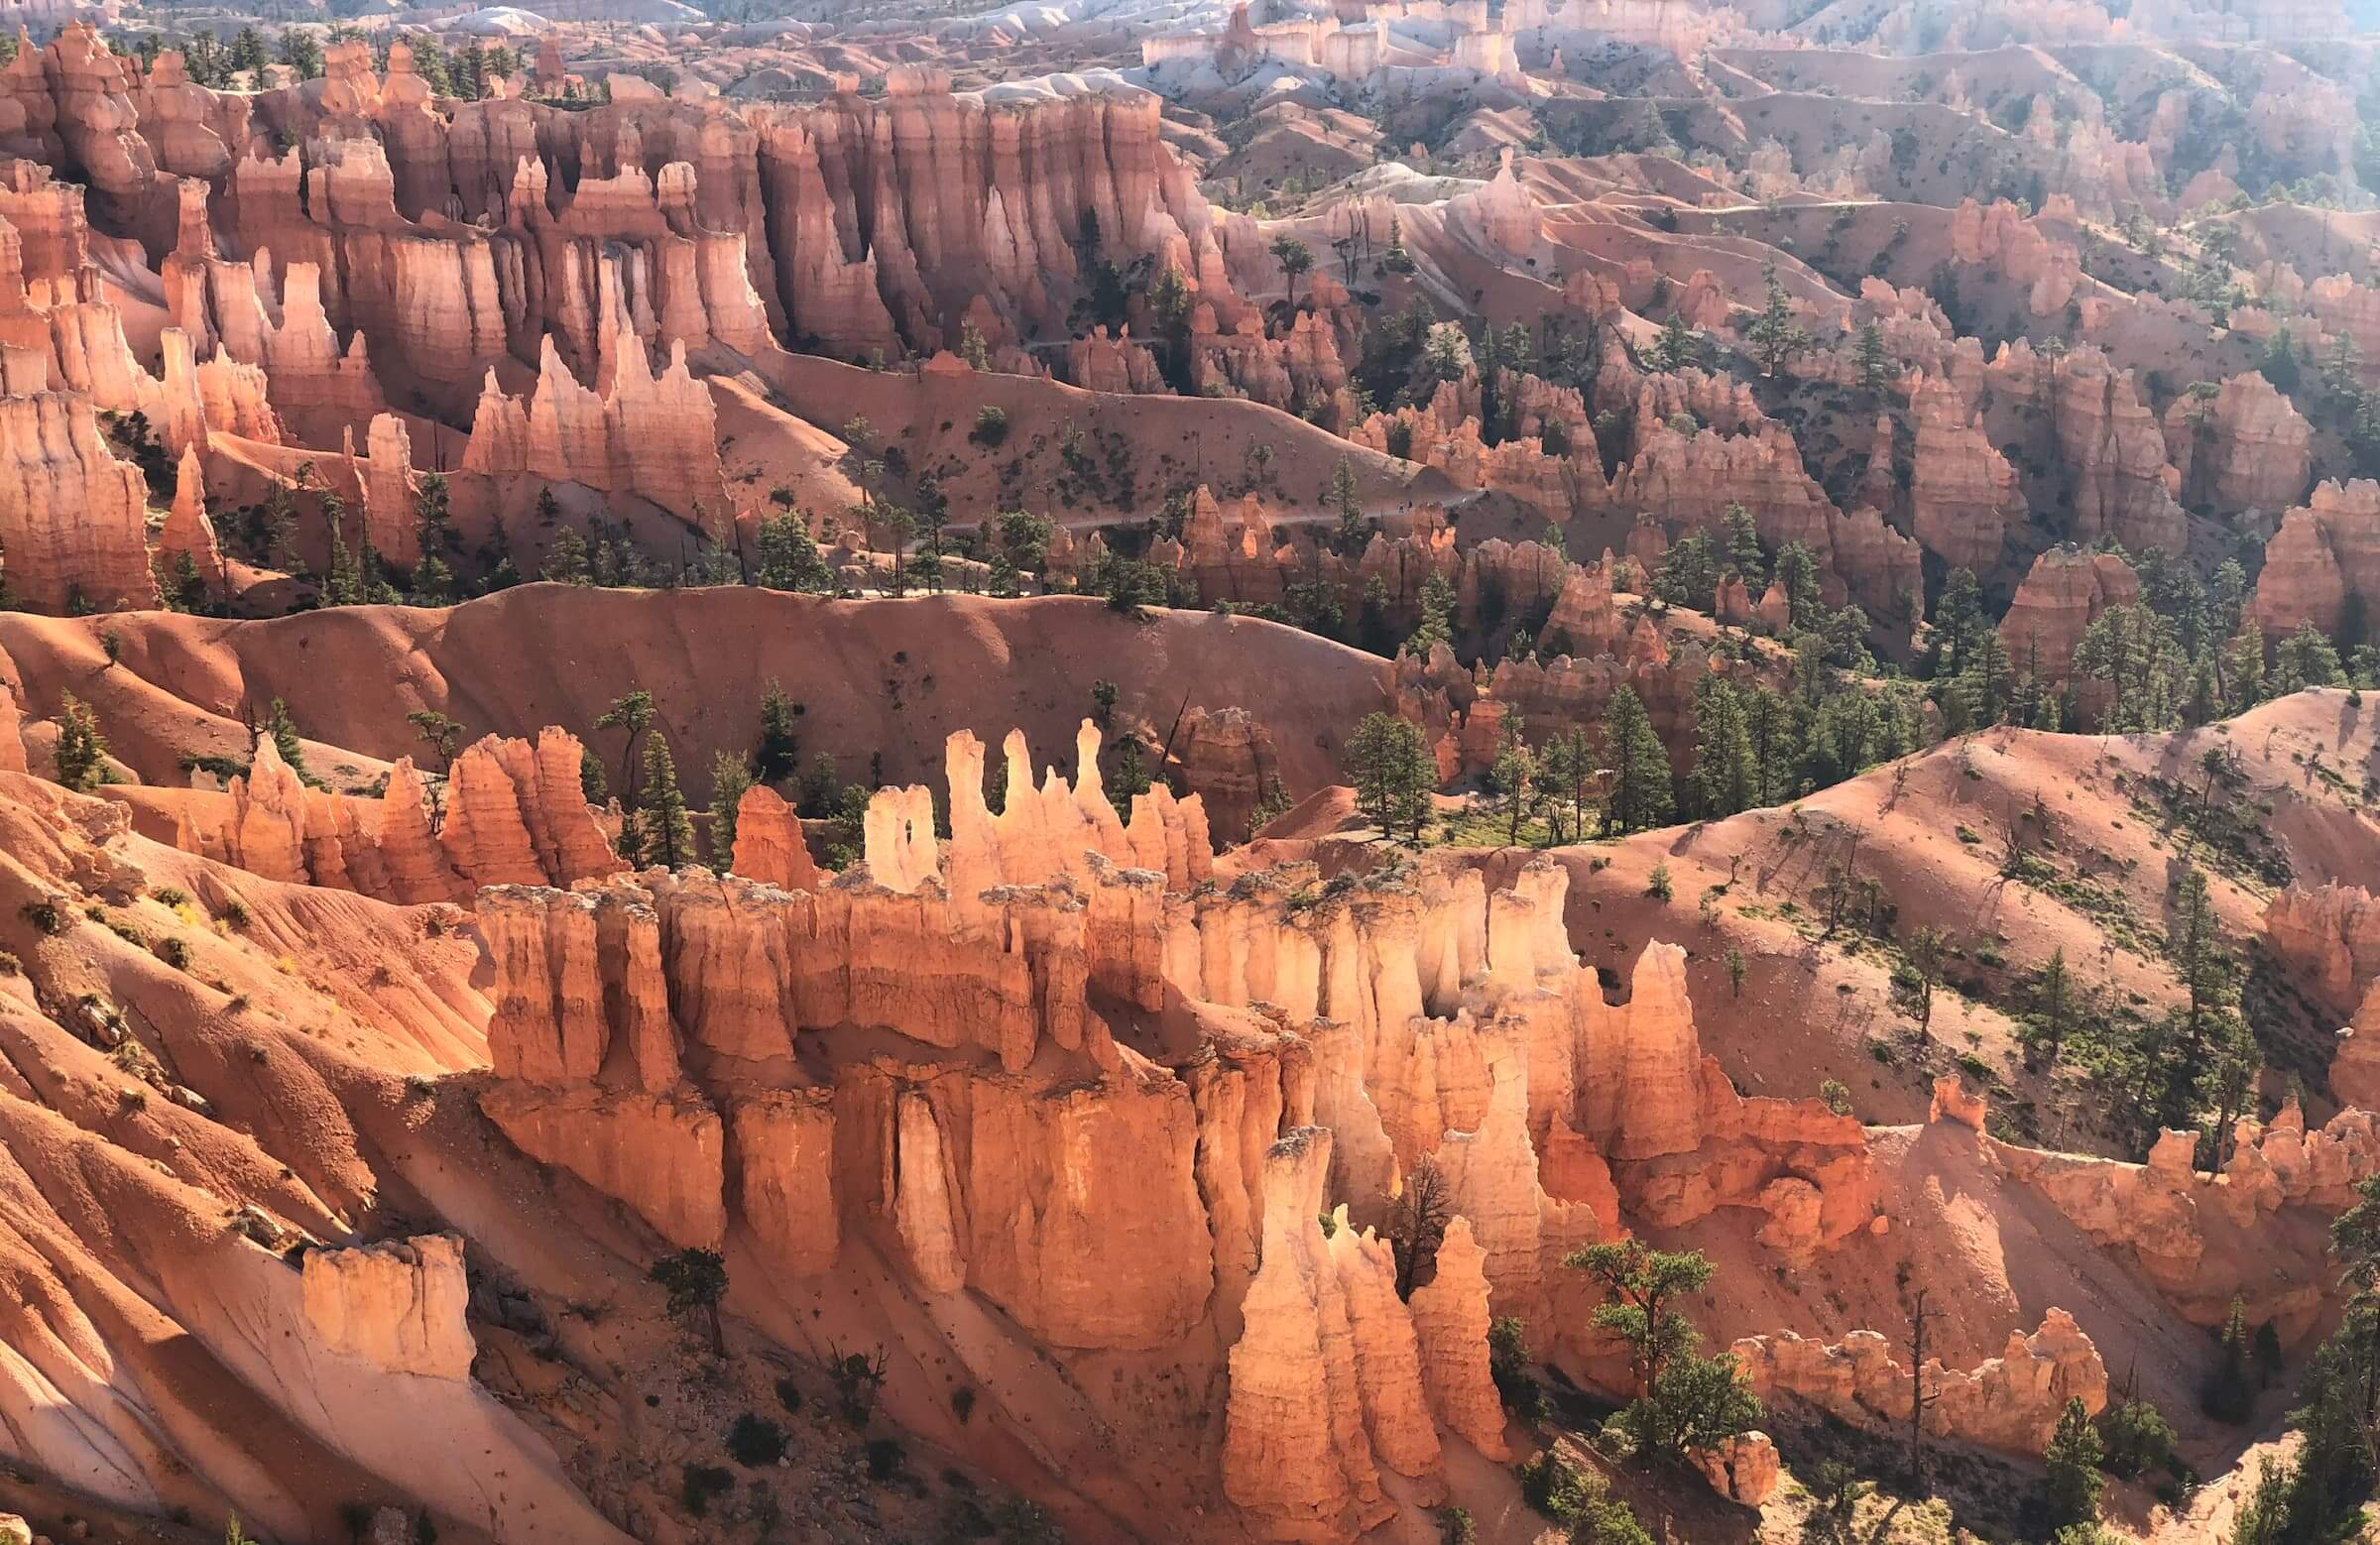
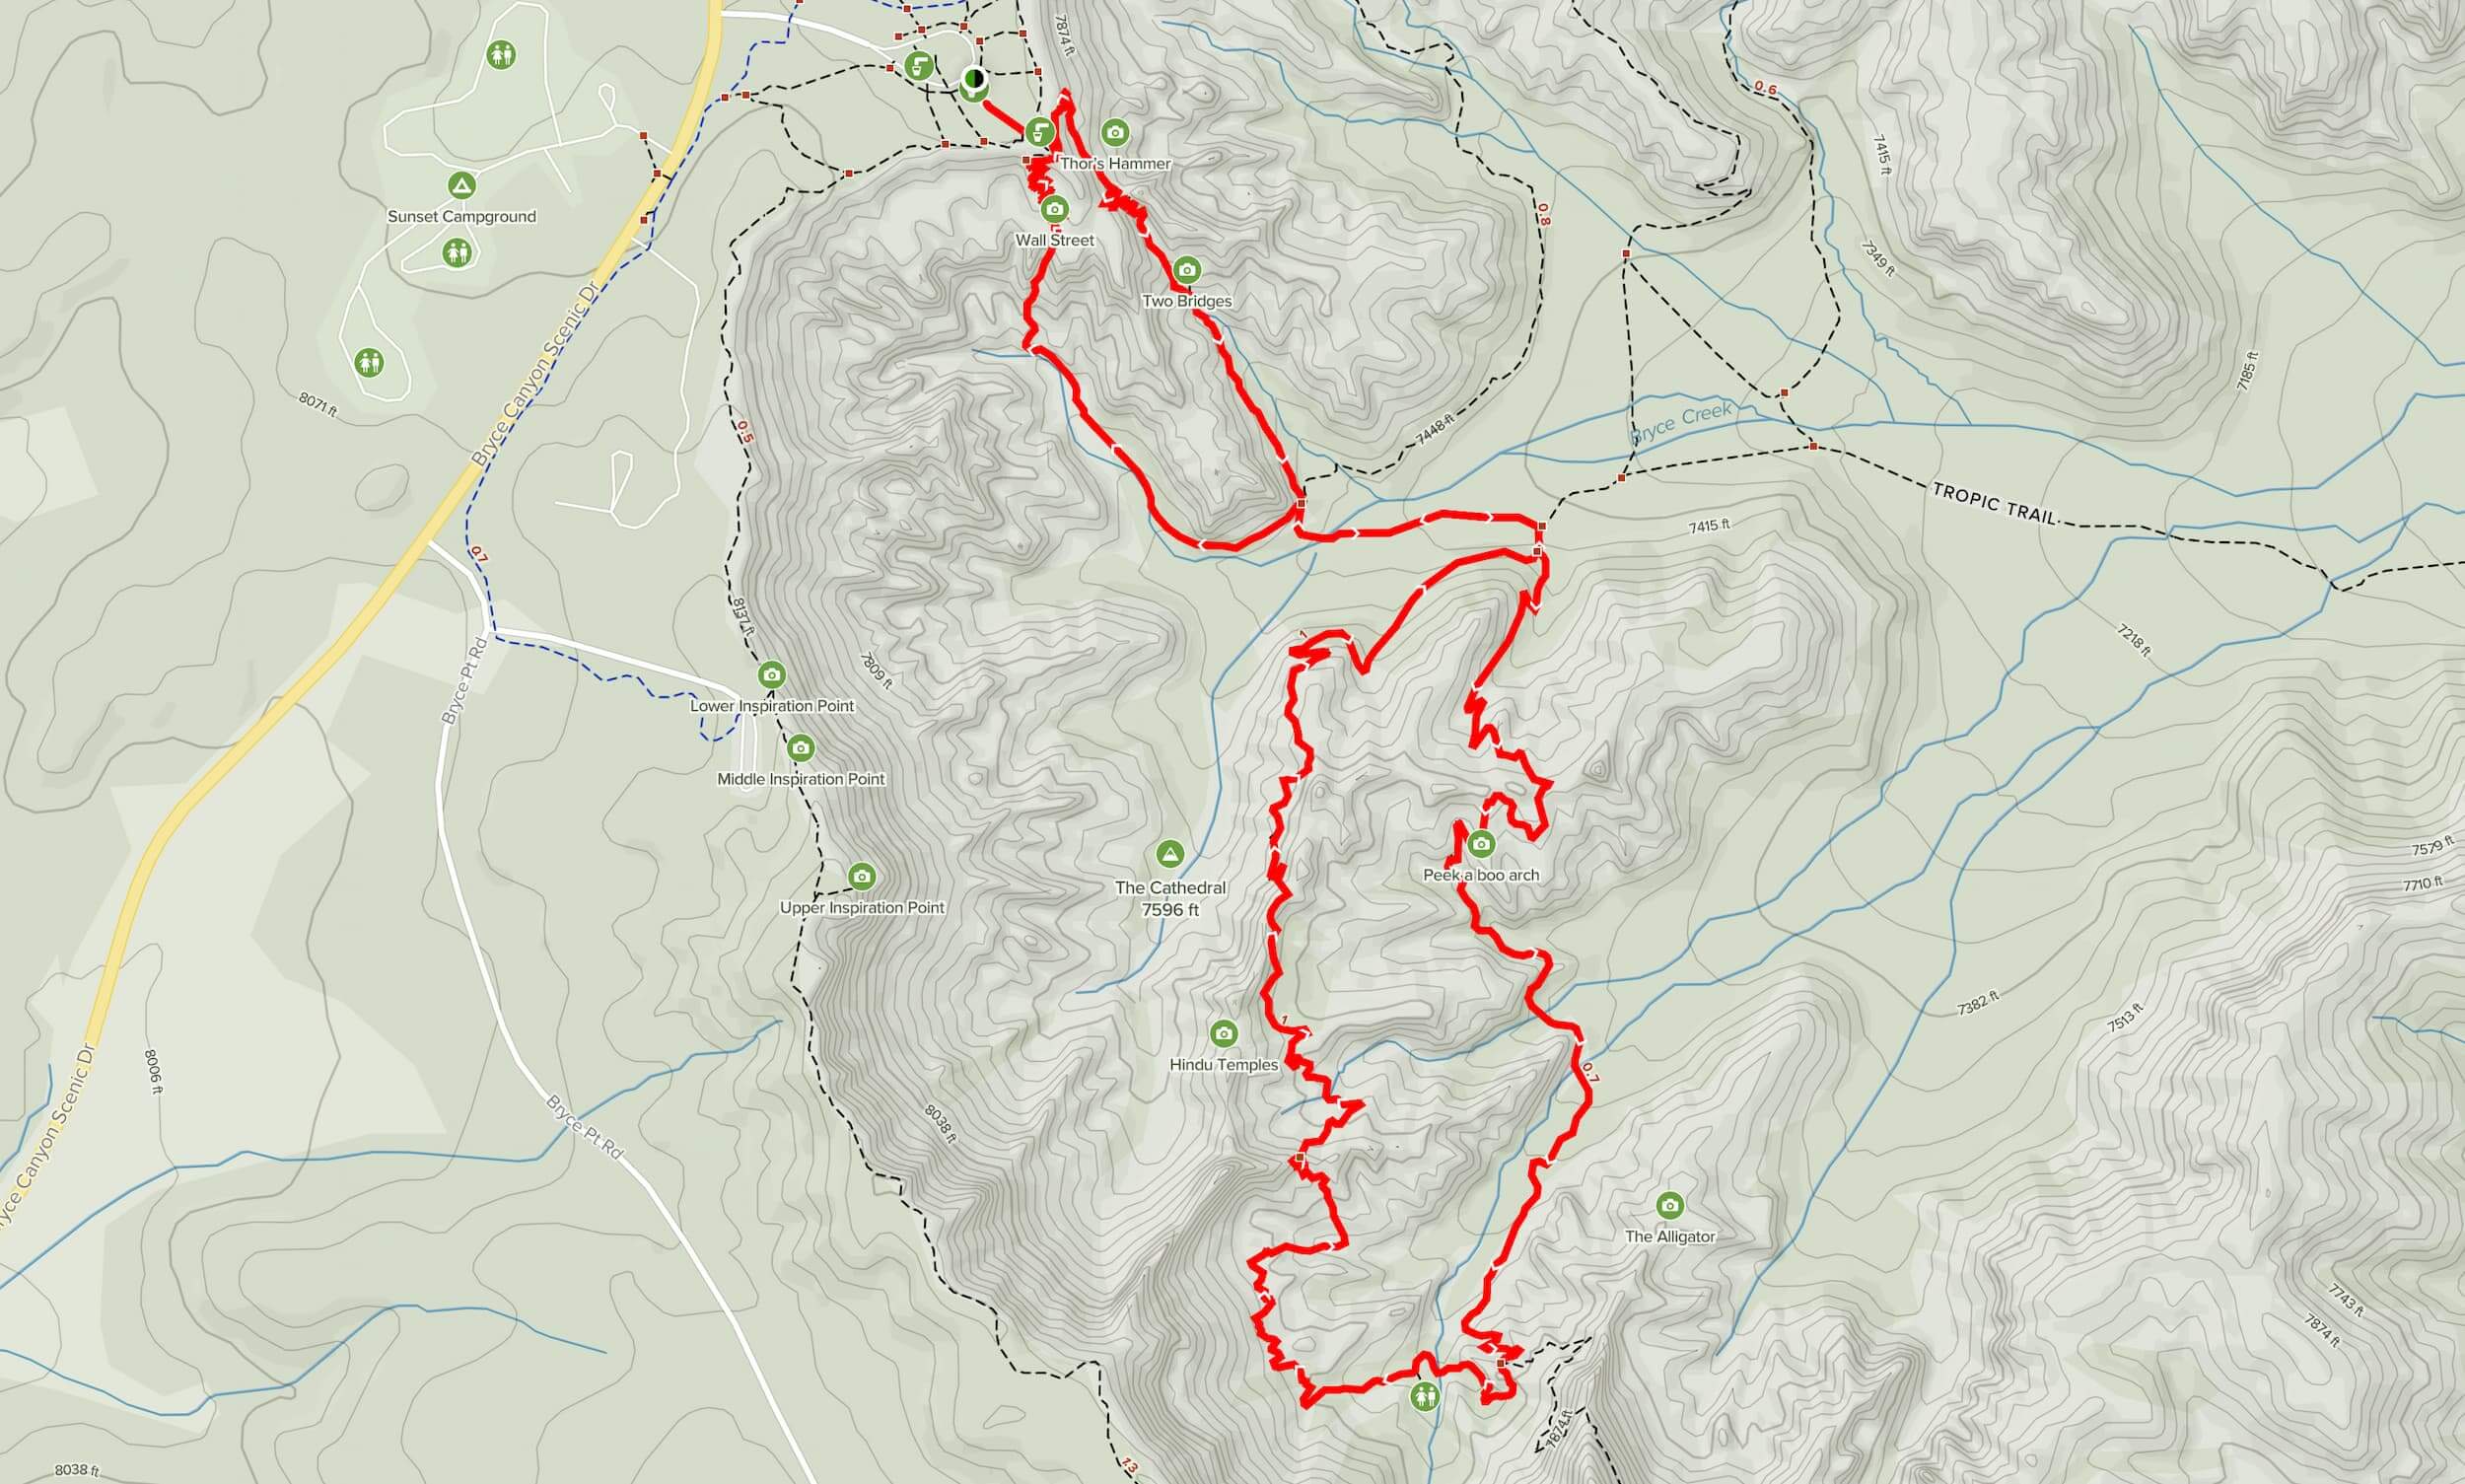
You have a lot of options at Bryce. The most popular routes through the canyon are Navajo Loop and Queen’s Garden. It’s only about three miles, but it’s a 500 foot climb out at the end, so make sure you conserve energy if you go that option.
We wanted to spend more time in the canyon so we started with the Navajo Loop, connected with the Peekabo Loop, then finished via Queen’s garden. All told it was probably seven miles with 2,000 feet of elevation. It was a pretty challenging hike because of the constant elevation change but it felt good to get away from the more crowded sections of the park. Unlike the other days when we were the first people out on the trail, we never had ten minutes to ourselves, but Peekabo had perhaps 80% fewer people than Navajo or Queen’s.
The area around Bryce was lovely. It’s at nearly 8,000 feet and I can imagine it would be terrific to spend a weekend there. With that said, after four hours or so we were ready to head back to Zion. We ended our trip with a celebratory dinner at King’s Landing, which I highly recommend. We’ll do this trip again in a few years – it was unforgettably good and there is a lot more park to explore.